Add a domain to your Google Cloud Storage API

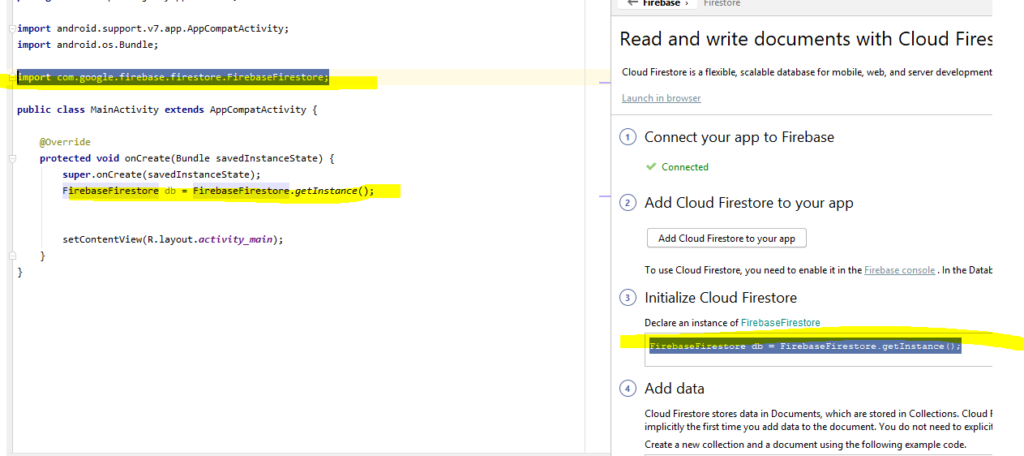
This is the process of adding a domain to your Google Cloud Storage.

I am assuming at this point you have a domain ready to use for your buckets in your Google Cloud project. Good reference website how to go about this is here: https://cloud.google.com/storage/docs/hosting-static-website.

Selecting Storage -> Browser in Google Cloud

Like always, let’s first login to our Google Cloud Console at https://console.cloud.google.com. Be in the correct Project of where you are going to add you domain to your storage.

Not sure about you but I have a bucket filled with images I want to connect a domain to already, so what is described below the case when you already have a bucket that you want to connect a domain to.

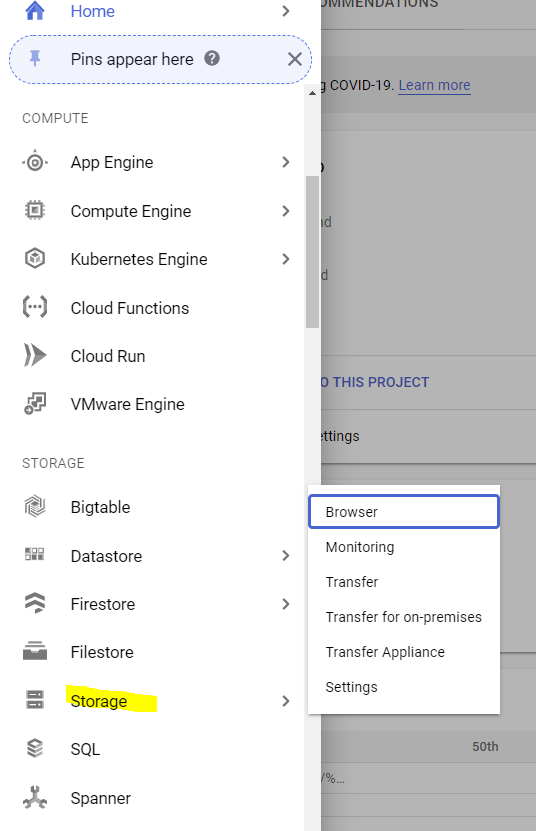
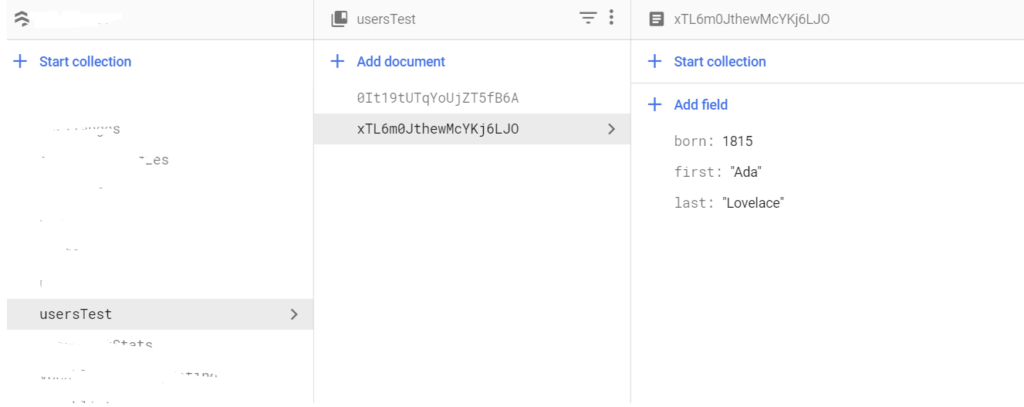
Renaming a bucket in Google Cloud

What we wish to do is rename the bucket we already have with a proper name of the desired domain we want to use such as yourdomain.com or img.yourdomain.com depending on how you want your custom domain connected.

Interesting enough for some reason, someone thought it was a good idea to not allow bucket renaming. So since it is impossible to rename a bucket, what we will do is just copy the one we already have to another newly-created one.

Create a new bucket, with your domain. My is going to be called, img.mydomain.com. The bucket settings are mostly up to you but remember to select Uniform for Access control.

At the list of your buckets click in on Cloud Shell in the right corner to open up the terminal. (see image to the left). Now enter the command to verify that you are in the right place and can see your bucket(s): gsutil ls.

The Cloud Shell Button

Do you see your old and newly bucket in the list? Great, then go for the command written below with your own bucket names with source-bucket as the old one, and dest-bucket as the newly created bucket we just made, which is in my case img.mydomain.com. Note you can use a root domain too, you don’t need to go with a subdomain.

gsutil -m rsync -r -d -p gs://source-bucket gs://dest-bucket

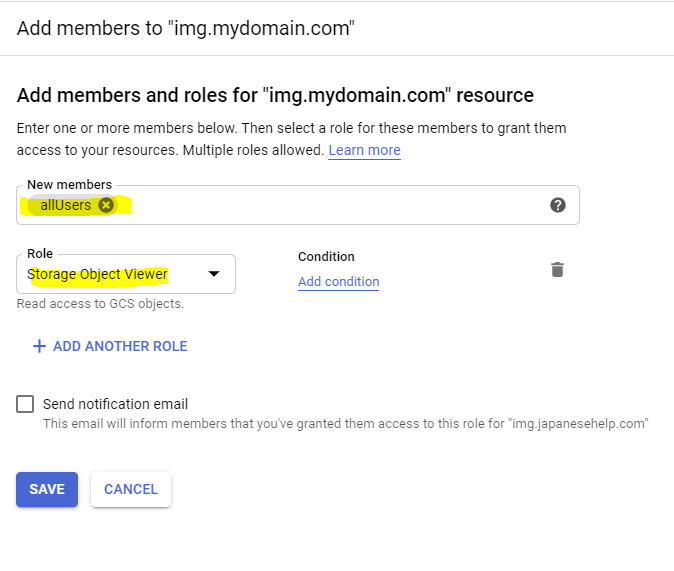
Files will start to copy into the new bucket. Now when this is done open up your new bucket and select the Permissions tab and select  Add members and type in allUsers. In the Select a role drop down, select the Cloud Storage sub-menu, and click the Storage Object Viewer option.

To serve your website through HTTPS, you need an SSL certificate. This section shows you how to add your bucket to a load balancer’s backend and how to add a new Google-managed SSL certificate to the load balancer’s front end.

console.cloud.google.com

Okay what Google tells us here is that we need a SSL certificate if we want to use HTTPS when loading our images, it’s not as complicated as it sounds since they will make the certificate for us.

Go to Network services, under Create load balancer, and click start configuration under HTTP(S) Load Balancing. Go with From Internet to my VMs. Go with some neat short name, mydom-lib for example, then in the Create or select backend services & backend buckets dropdown, go to the Backend buckets sub-menu, and click the Create a backend bucket option, make a bucket with any name you would like, then at Cloud Storage bucket select your bucket from before. Check Enable Cloud CDN check box.

Host and path rules should already have the bucket you created for the balancer earlier.

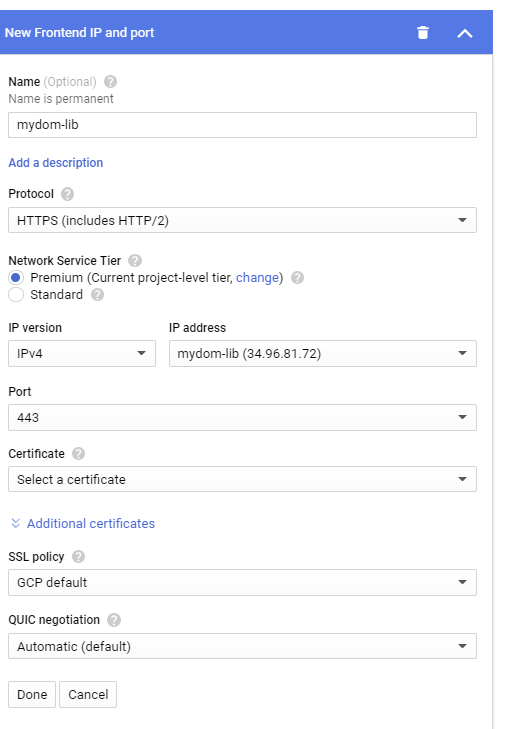
For the front end configuration, check HTTPS, port 443, click create IP adress, and go with the same name as before, mydom-lib for example

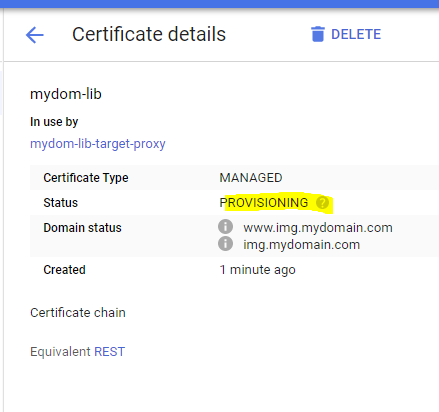
When all of this is done (see image to left), last step is to click on Select a certificate and Create a new certificate, again, I go with mydom-lib just to keep it easy, and select Create Google-managed certificate. Add your domains img.mydomain.com and www.img.mydomain.com and click Create.

Click on Create as review and finalize is optional.

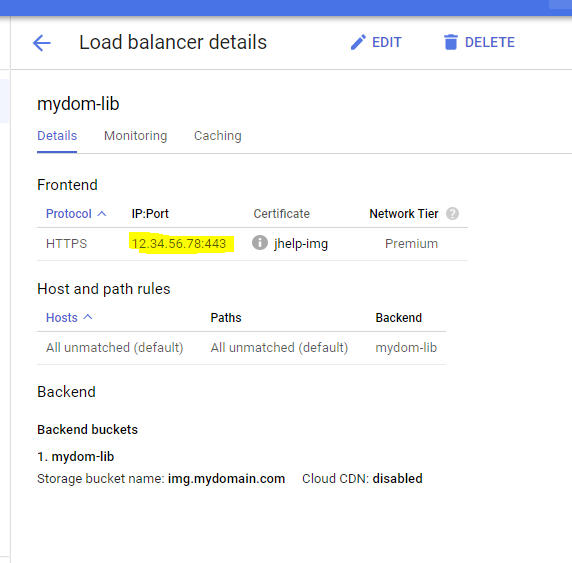
Click on your load balancer in the list which you’ve arrived after creating one, it should look like something similar to the picture above. See the IP Address there? That’s what we want to use for our DNS in the domain.

Use the Google Cloud Balancer IP Address for your domain

Personally I have Godaddy, so let’s open Godaddy. Find your domain and open up the DNS settings where you can add records. https://dcc.godaddy.com/manage/mydomain.com/dns This is the Godaddy DNS location, note you must change mydomain.com to your domain.

Record example of two records of www and @ with data/value to 30.90.80.100 of A type

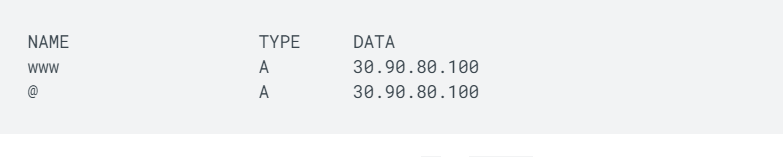
If you are having your whole domain connected to the storage, go with as shown in the picture above, add two records www and @ with the type of A, with the IP Address you have in your load balancer.

In my case, I use a subdomain, so I will simply just add one record of A type, with NAME of img, and with IP to the one of my balancer.

We can check the certificate status and see it is still not activated as it says PROVISIONING

It can take hours before the DNS for the domain has been updated. But if we are lucky we can see the results quite fast. Before then, you can get all kinds of errors, like ERR_SSL_VERSION_OR_CIPHER_MISMATCH. Just need some patience! Also if you forgot something this is pretty forgiving and it is easy to change the settings after saved various things.

See the update in action

Waited long enough and ready for some balance action? Let’s try loading an image over the domain.

Go to one of your pictures that you have on your bucket of images that has the name of this domain you created in the beginning.

An image object inside the bucket of img.mydomain.com

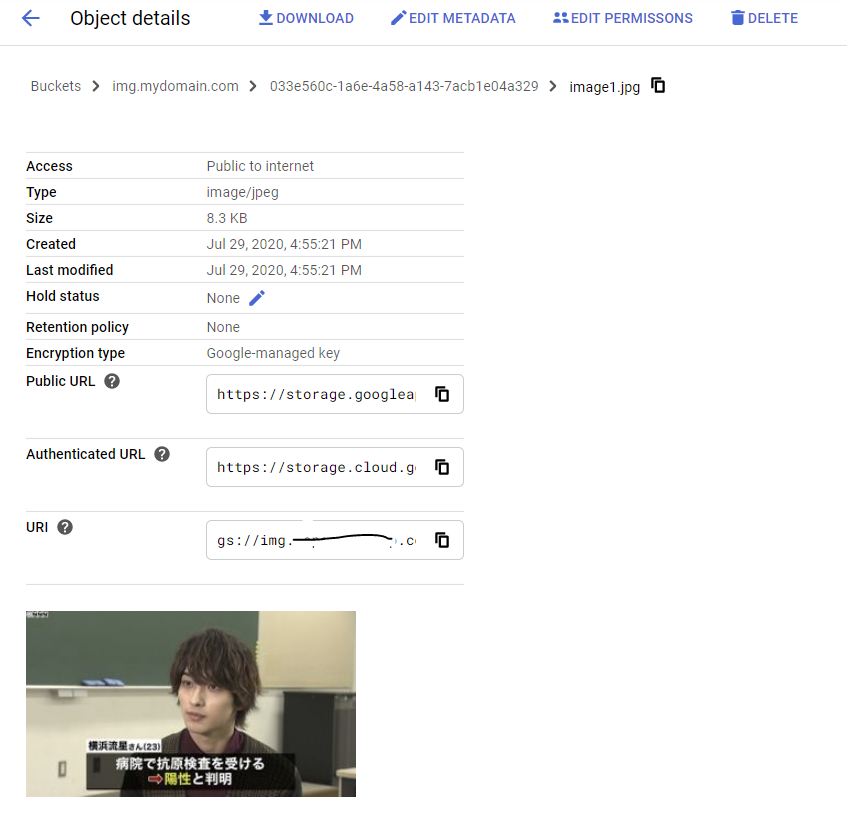
Now you can go ahead and copy the public url of that photo, mine looks like this:
https://storage.googleapis.com/img.mydomain.com/033e560c-1a6e-4a58-a143-7acb1e04a329/image1.jpg

Now try replacing storage.googleapis.com/img.mydomain.com with your domain, like this:
https://img.japanesehelp.com/033e560c-1a6e-4a58-a143-7acb1e04a329/image1.jpg
If you can see the photo then it is confirmed it is working as expected.

Note that http does not work, you must use https. This is what the documentation says about this.

Note: To redirect traffic from HTTP to HTTPS, you need to set up an additional HTTP load balancer with a redirect setting in the URL map. For instructions, see Setting up HTTP-to-HTTPS redirect for external HTTP(S) load balancers.

Google Cloud Documentation

Make http redirect to https

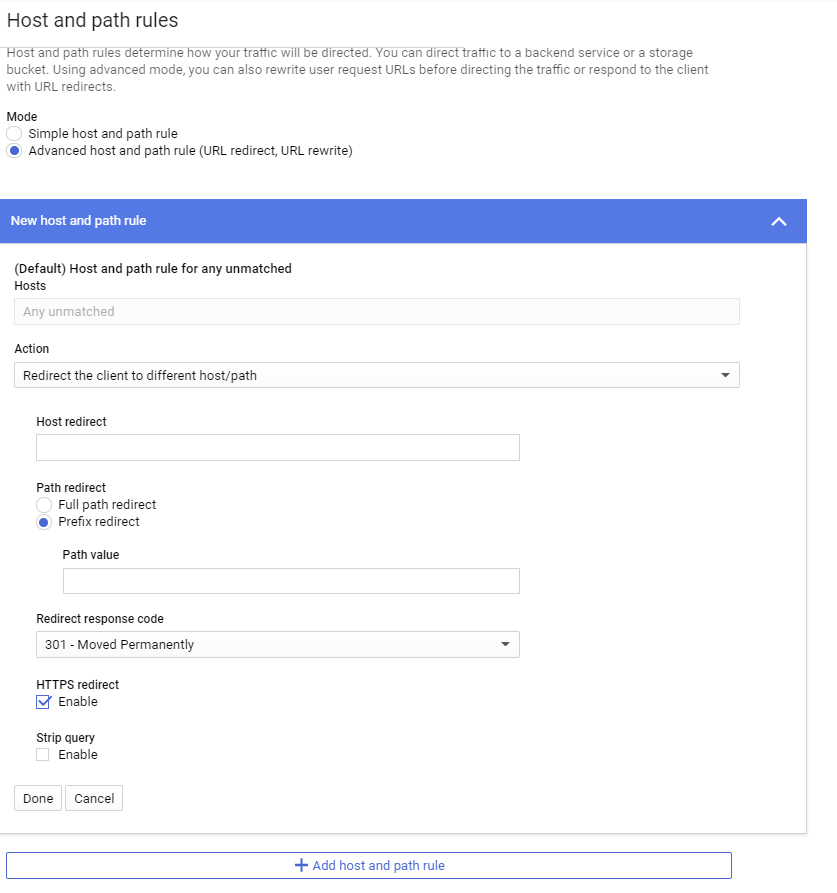
Go back to the load balance page. https://console.cloud.google.com/networking/loadbalancing/add?_ga=2.21780475.1310845519.1595928318-1531761783.1542900100 and click Start configuration under HTTP(S) Load Balancing. Choose From Internet to my VMs. Name it to something similar to what you did before but that it indicates http, so I’ll go with: dom-lib-http. Skip Backend configuration and jump straight to Host and path rules. Check Advanced host and path rule (URL redirect, URL rewrite). Action, select Redirect the client to different host/path. Under Path redirect, select Prefix redirect. Under Redirect response code, select 301 – Moved Permanently. Under HTTPS redirect, select Enable, then done.

New balancer for http redirect

For Configure the frontend, enter http-content-rule. Keep Protocol to HTTP. Name it http-content-rule or something you’d prefer. Choose the IP address you created before from when you did this for HTTPS. Keep it at port 80.

Create! Then you should be done and have a http redirection to the https balancer one you created from earlier. Note that this also takes a while before it updates and you can visit links of your storage with your custom domain on http.

Get easily started with Firebase in Android Studio

Before I thought it was a hassle to get started with a new project with Android Studio for Firebase but there are now some great tools in Android Studio to speed up the process. My goal for this post is to show you how to get started with Firestore for a new app to your firebase account. I currently running Android Studio 4.0.1.

Lets go to https://firebase.google.com/docs/android/setup and see at “Option 2: Add Firebase using the Firebase Assistant” which is what we want to do here.

  1. In your Android Studio, create a new Android Project. Note that even if you do this in Java instead of Kotlin it might work just fine, but can’t guarantee the experience to be the same.
Making a new project with language Kotlin and minimum SDK API 16 with a Basic Activity
  1. Open up File > Settings > Plugins > Firebase Services > and select Update to keep the Firebase services updated. In case you don’t have it installed, install it.
  2. Select Tools > Firebase to open the Assistant pane.
Selecting Firestore

Firebase Assistant Steps

  1. Click Connect to Firebase.
    Then we will get this popup where we just select our project then click Connect.
  2. The second step is what is the time saver for sure, click this button and you will be greeted with information that the program will add some things (dependencies) to your gradle files. Accept changes.

    Unfortunately it can happen that there there is an issue when trying to sync the gradle files. I got this generated in my build gradle file:
    classpath ‘com.android.tools.build:gradle:3.2.1’
    classpath ‘com.google.gms:google-services:4.3.3’

    An nice soul explained that changing from com.google.gms:google-services:4.3.0 to (we have 4.3.3 in my case) to com.google.gms:google-services:4.2.0 fixed the issue. This might work for you too if you are having such problem.
  3. You should get a check mark on step two, and now for third step, you finally get access to the Firestore library where you can start having fun, so start by copying or writing the code for the Firebase Firestore object:
    In Java (see image as well): FirebaseFirestore db = FirebaseFirestore.getInstance();
    In Kotlin (see image as well): val db = FirebaseFirestore.getInstance()
    into your main activity located somewhere in MainActivity inside your onCreate function, and remember to click ALT+ENTER to import the dependencies or write in the top of MainActivity:
    import com.google.firebase.firestore.FirebaseFirestore;
How it looks when you’ve done step three.

Or it does look like this (with Kotlin)

Using Kotlin have different syntax

Add data step (4)

Cloud Firestore stores data in Documents, which are stored in Collections. Cloud Firestore creates collections and documents implicitly the first time you add data to the document. You do not need to explicitly create collections or documents.

Firebase > Firestore Step 4: Add Data

Collections and documents are created implicitly in Cloud Firestore. Simply assign data to a document within a collection. If either the collection or document does not exist, Cloud Firestore creates it.

Google Firebase Firestore

This means that you do not need to do these two steps below, but remember this place. This is where your documents will be created. Just for the sake of learning how documents “looks” in the Firebase UI, lets create a collection and a document.

Indicating the button where to create a Firestore collection
Your first document can be anything. Just make something to create the collection.

What is amazing with firestore is that you can just push in data anywhere without much preparation, all you need is just to connect to your Firebase project and it will just work from there on.

So why don’t we just paste the whole code block from step four into our OnCreate function and see the magic work for itself.

Below is my whole file of MainActivity where I have pasted the code from step 4 for writing data just after the db object declaration and initialization. Note that you must add a property for the TAG which is used in the example. Another change is that I changed my collection name from users to usersTest but it doesn’t matter, it is just the desired collection name that will be created. If you are writing in Java syntax will obviously be different but this is how my code looks so far after copying the sample code and pasting it into my activity.

package fileidea.firestore

import android.os.Bundle
import android.view.Menu
import android.view.MenuItem
import androidx.appcompat.app.AppCompatActivity
import com.google.android.material.floatingactionbutton.FloatingActionButton
import com.google.android.material.snackbar.Snackbar
import com.google.firebase.firestore.FirebaseFirestore


class MainActivity : AppCompatActivity() {

    private val TAG = "MainActivity"

    override fun onCreate(savedInstanceState: Bundle?) {
        super.onCreate(savedInstanceState)

        val db = FirebaseFirestore.getInstance()

        // Create a new user with a first and last name

        // Create a new user with a first and last name
        val user: MutableMap<String, Any> = HashMap()
        user["first"] = "Ada"
        user["last"] = "Lovelace"
        user["born"] = 1815

        // Add a new document with a generated ID

        // Add a new document with a generated ID
        db.collection("users")
                .add(user)
                .addOnSuccessListener { documentReference -> Log.d(TAG, "DocumentSnapshot added with ID: " + documentReference.id) }
                .addOnFailureListener { e -> Log.w(TAG, "Error adding document", e) }
        setContentView(R.layout.activity_main)
        setSupportActionBar(findViewById(R.id.toolbar))

        findViewById<FloatingActionButton>(R.id.fab).setOnClickListener { view ->
            Snackbar.make(view, "Replace with your own action", Snackbar.LENGTH_LONG)
                    .setAction("Action", null).show()
        }
    }

    override fun onCreateOptionsMenu(menu: Menu): Boolean {
        // Inflate the menu; this adds items to the action bar if it is present.
        menuInflater.inflate(R.menu.menu_main, menu)
        return true
    }

    override fun onOptionsItemSelected(item: MenuItem): Boolean {
        // Handle action bar item clicks here. The action bar will
        // automatically handle clicks on the Home/Up button, so long
        // as you specify a parent activity in AndroidManifest.xml.
        return when (item.itemId) {
            R.id.action_settings -> true
            else -> super.onOptionsItemSelected(item)
        }
    }
}

If everything is in order, the application when it starts should write one document to a new collection called usersTest, and this user has three fields: first, last and born with the specified data from above (Ada, Lovelace, 1815). Now to see if is actually writing, we can check the Logcat in Android Studio, and also in Firebase under Firestore. Let’s try start the application right now and be ready with your Logcat.

The Android Studio Logcat

Running the app can be done with SHIFT+F10.
Right away I got some problem installing the application, something with “Cannot fit requested classes in a single dex file.Try supplying a main-dex list” when running the application. What I did was adding an implementation and set using multiDexEnabled: true (see code block below). Referring to this StackOverFlow post.

My build.gradle (app) looked like this in the end with successful build:

apply plugin: 'com.android.application'
apply plugin: 'kotlin-android'
apply plugin: 'kotlin-android-extensions'
apply plugin: 'com.google.gms.google-services'

android {
    compileSdkVersion 29

    defaultConfig {
        applicationId "fileidea.firestore"
        minSdkVersion 16
        targetSdkVersion 29
        versionCode 1
        versionName "1.0"
        multiDexEnabled true
        testInstrumentationRunner "androidx.test.runner.AndroidJUnitRunner"
    }

    buildTypes {
        release {
            minifyEnabled false
            proguardFiles getDefaultProguardFile('proguard-android-optimize.txt'), 'proguard-rules.pro'
        }
    }
    compileOptions {
        sourceCompatibility JavaVersion.VERSION_1_8
        targetCompatibility JavaVersion.VERSION_1_8
    }
    kotlinOptions {
        jvmTarget = '1.8'
    }
}

dependencies {
    implementation fileTree(dir: "libs", include: ["*.jar"])
    implementation "org.jetbrains.kotlin:kotlin-stdlib:$kotlin_version"
    implementation 'androidx.core:core-ktx:1.1.0'
    implementation 'androidx.appcompat:appcompat:1.1.0'
    implementation 'com.google.android.material:material:1.0.0'
    implementation 'androidx.constraintlayout:constraintlayout:1.1.3'
    implementation 'androidx.navigation:navigation-fragment-ktx:2.1.0'
    implementation 'androidx.navigation:navigation-ui-ktx:2.1.0'
    implementation 'com.google.firebase:firebase-firestore:21.5.0'
    implementation 'com.android.support:multidex:1.0.3'
    testImplementation 'junit:junit:4.12'
    androidTestImplementation 'androidx.test.ext:junit:1.1.1'
    androidTestImplementation 'androidx.test.espresso:espresso-core:3.2.0'

}

Error adding document PERMISSION_DENIED ?

If you got below error your FireStore rules are not open enough probably. Check the rules.

Logcat shows error when trying to adding documents

As we see above we can see that there is error when adding documents and that there are insufficient permissions. This most likely means that you need to go to FireBase and your project, and to Firestore and open up the rules for writing (see below). Also, remember, this rules are insecure and should not be used in production.

Seeing the succesful result

The successful document write should look like this:

Let’s take a look at the Database tab in the administration page of Firebase of your project

Select Database then FireStore if asked

We can then confirm that we got the documents in Firestore! This is how to get started with FireStore in Android Studio by just connecting basically and pasting in some code. Of course, how it is up to you to make a nice design and functionality. In similar ways you can read data by following the steps in Android Studio as well, pretty much the same thing!