First of all, create a new Scene by going to your Scenes folder under Assets and right click Create Scene. Name it something like MainMenu. While you’re at it, rename your main scene to something better if it’s named SampleScene to MainScene.
Create a new GameObject under the UI category and choose Button.
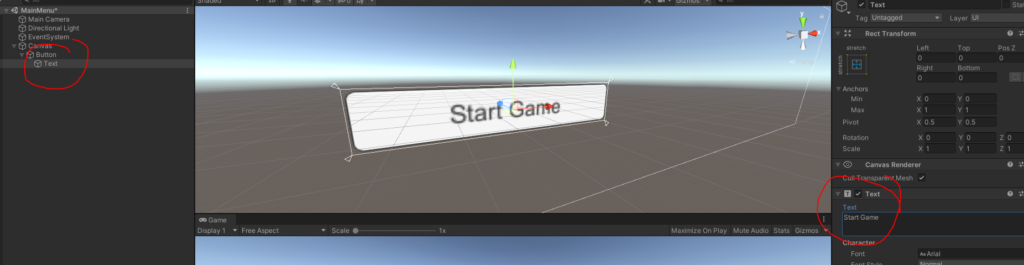
Go to the Text child object under the Button and Choose Text, change the Text from to something like Start Game like the picture below.
Start game button in Unity
4. Select the Button and Add Component, and select New Script, name it btnStart.
5. Double click on the btnStart script name to open up Visual Studio to start editing it, and add the following.
using UnityEngine;
using UnityEngine.UI;

public class btnStart : MonoBehaviour
{
    Button _btn;
    // Start is called before the first frame update
    void Start()
    {
        _btn = this.GetComponent<Button>();
        _btn.onClick.AddListener(TaskOnClick);
    }

    void TaskOnClick()
    {
        Debug.Log("You have clicked the button!");
    }
}
As you can see in the Console in Unity, we are now getting a log message when we click the button. We can now simple do whatever we want, such as go to our MainScene.
using UnityEngine;
using UnityEngine.SceneManagement;
using UnityEngine.UI;

public class btnStart : MonoBehaviour
{
    Button _btn;
    // Start is called before the first frame update
    void Start()
    {
        _btn = this.GetComponent<Button>();
        _btn.onClick.AddListener(TaskOnClick);
    }

    void TaskOnClick()
    {
        SceneManager.LoadScene("MainScene", LoadSceneMode.Single);
    }
}
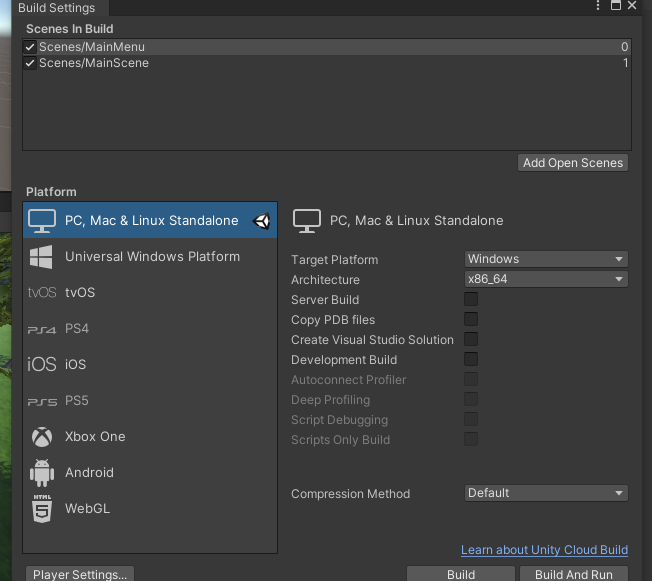
If you get the error:
Scene ‘MainScene’ couldn’t be loaded because it has not been added to the build settings or the AssetBundle has not been loaded. To add a scene to the build settings use the menu File->Build Settings… UnityEngine.SceneManagement.SceneManager:LoadScene (string,UnityEngine.SceneManagement.LoadSceneMode) btnStart:TaskOnClick () (at Assets/Scripts/btnStart.cs:17) UnityEngine.EventSystems.EventSystem:Update ()
Then go to File in the top left, and select Build Settings… and click on Add Open Scenes for your MainMenu and MainScene.
That is the essentials of it! Now you can change up colors and make things more interesting of course. I thought about adding more to this tutorial but don’t think it’s necessary since it is kind of straight forward.
In my previous post I made a short post about how to make a character move with the Character Controller component in the end. We can continue on this path and add some more to our script to make our character use a walking animation too. This is a tutorial on how to move character with animation through script. Thankfully there are already some great assets out there and one I found useful was the animation package called Basic Motions made by Kevin Iglesias.
If you download Basic Motion there you can drag the Prefab BasicMotionsDummy into your scene.
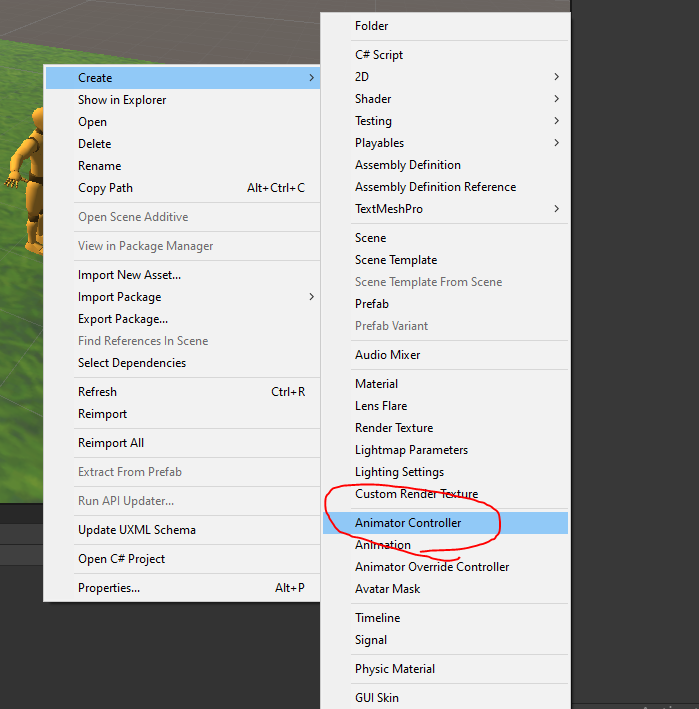
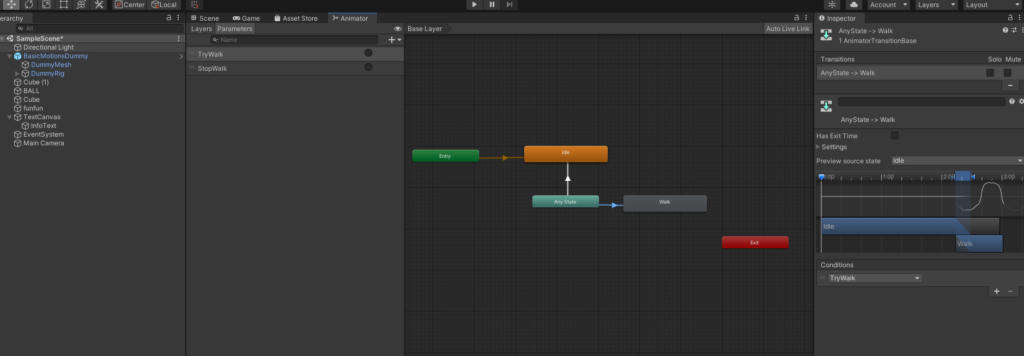
Then what I did was creating a new Animation controller for your character
Add your new Animation Controller to your Controller for your BasicMotionsDummy character. Then edit the new controller and expand the BasicMotions@Walk animation from the Basic Motions/Animations/Movement folder and pick the one called “BasicMotions@Walk01 – Forwards” into your controller. Also add the idle animation “BasicMotions@Idle01“. You can rename your animations to something more simple like Walk and Idle. Then add transition and add a transition from Any State to your Walk one, and do the same for Idle. Then go to the Parameters tab and add two new parameters, TryWalk and StopWalk. Click on the white arrow from Any State to your Walk animation and plus click to add a Condition, select “TryWalk”. Do the same for idle, click on the white arrow from Any State to your Idle and add “StopWalk”.
Now select so that you use your Animator Controller as Controller in your BasicMotionsDummy character.
Since we now have triggers which will play the animations we can trigger them through our scripts with simply animator.Trigger(“TryWalk”) or animator.Trigger(“StopWalk”) for example. Let’s take a look. Add a script called MainCharacter to your character controller 3D object with the following code:
We have in our Start() method initialized the controller and the animator component which we can trigger animations on, which we do when we call the functions above. We will also keep track if we have started the animation as well.
Whenever we are walking, we will check if the walking trigger event is actually not already triggered, if it is not, then we can proceed with triggerWalk().
The opposite goes for stopWalk, if we are not walking, and we have already not triggered the stopWalk event, then we will triggerStopWalk().
We are always keeping track of if we are walking by comparing the current transform position of x and z with the previously stored property prevPos. If these two are’nt the same we are walking.
prevPos = transform.position;
Here we store the current position for the next incoming transform position value comparison (as above).
We have only one problem, we start walking the first thing we do, even if we stand still. That is because the isWalking is checking the previous value if it is same as before, which it isn’t since we don’t have a previous value which is the same. We can add another condition and check the input keys if we have touched them, maybe not the prettiest but it works. So with a new property named hasStartedMoving we set it to false first, and if we got Input.GetAxis from Horizontal or Vertical, we set the property to true, and can therefore use it to determine if we are Walking along with the other conditions. So full code below.
That is about it! Hopefully you learned little bit of how you can make your character moving with an animation using a script in Unity with the CharacterController component.
Using Rigidbody
More popular method is to have so that your player character is using the Rigidbody instead, so that we can take use of the worlds physics easier. It would could look something like this.
using UnityEngine;
using UnityEngine.UI;
public class MainCharacterB : MonoBehaviour
{
private Rigidbody _rigidbody;
private Animator animator;
[SerializeField]
private float speed = 100.0f;
[SerializeField]
private float jumpPower = 150;
    private Vector3 prevPos;
    private bool isWalking;
    private bool walkingTriggered;
    private bool stopWalkingTriggered;
private bool hasStartedMoving = false;
void Start()
{
_rigidbody = GetComponent<Rigidbody>();
animator = GetComponent<Animator>();
}
    void triggerWalk()
    {
        animator.SetTrigger("TryWalk");
        walkingTriggered = true;
        stopWalkingTriggered = false;
    }
    void triggerStopWalk()
    {
        animator.SetTrigger("StopWalk");
        stopWalkingTriggered = true;
        walkingTriggered = false;
    }
// Update is called once per frame
void Update()
{
if (isWalking)
{
if (!walkingTriggered)
{
triggerWalk();
}
}
else
{
if (!stopWalkingTriggered)
{
triggerStopWalk();
}
}
isWalking = ((prevPos.x != transform.position.x) || (prevPos.z != transform.position.z)) && hasStartedMoving;
prevPos = transform.position;
float horizontalInput = Input.GetAxis("Horizontal");
float verticalInput = Input.GetAxis("Vertical");
Vector3 move = new Vector3(horizontalInput, yAxis, verticalInput);
if (horizontalInput > 0 || verticalInput > 0)
{
hasStartedMoving = true;
}
if (move != Vector3.zero)
{
// Set the forward direction of the transform to be same as where we are going.
transform.forward = move;
}
Vector3 vel = new Vector3(move.x * Time.deltaTime * speed, move.y * Time.deltaTime * speed, move.z * Time.deltaTime * speed);
_rigidbody.velocity = vel;
}
}
The “magic” is that we move our character like previously from the input of GetAxis Horizontal and Vertical, but this time we set the velocity of the rigidbody to move forward.
While we are at it, we should use FixedUpdate to get the best performance:
using System;
using System.Collections.Generic;
using UnityEngine;
using UnityEngine.UI;

public class MainCharacterB : MonoBehaviour
{
    private Rigidbody _rigidbody;

    //private Rigidbody _rigidbody;
    private Animator animator;
    [SerializeField]
    private float speed = 100.0f;
    [SerializeField]
    private float jumpPower = 350;

    private Vector3 prevPos;
    private bool isWalking;
    private bool walkingTriggered;
    private bool stopWalkingTriggered;
    private bool hasStartedMoving = false;

    float yAxis;
    private float horizontalInput;
    private float verticalInput;

    void Start()
    {
        _rigidbody = GetComponent<Rigidbody>();
        animator = GetComponent<Animator>();
    }

    void triggerWalk()
    {
        animator.SetTrigger("TryWalk");
        walkingTriggered = true;
        stopWalkingTriggered = false;
    }
    void triggerStopWalk()
    {
        animator.SetTrigger("StopWalk");
        stopWalkingTriggered = true;
        walkingTriggered = false;
    }

    private void FixedUpdate()
    {
        Vector3 move = new Vector3(horizontalInput, yAxis, verticalInput);

        if (move != Vector3.zero)
        {
            // Set the forward direction of the transform  to be same as where we are going.
            transform.forward = move;
        }
        Vector3 vel = new Vector3(move.x * Time.deltaTime * speed, _rigidbody.velocity.y, move.z * Time.deltaTime * speed);
        _rigidbody.velocity = vel;
    }

    // Update is called once per frame
    void Update()
    {
        if (isWalking)
        {
            if (!walkingTriggered)
            {
                triggerWalk();
            }
        }
        else
        {
            if (!stopWalkingTriggered)
            {
                triggerStopWalk();
            }
        }

        isWalking = ((prevPos.x != transform.position.x) || (prevPos.z != transform.position.z)) && hasStartedMoving;
        prevPos = transform.position;

        horizontalInput = Input.GetAxis("Horizontal");
        verticalInput = Input.GetAxis("Vertical");

        if (horizontalInput > 0 || verticalInput > 0)
        {
            hasStartedMoving = true;
        }
    }
}

Latest Comments