
The combination with Angular, Nodejs and MySQL is very powerful. I am a huge fan of MySQL, started using it in 2007 and here we are, 2020 and people still using it a lot for websites and web services. On top of that, I just found out that MySQL was created by some Swedes back in 1995, the same country as where I am from! Okay now let’s get started.
What we are going to do is super a simple Angular app which where you can create, read, update and delete (CRUD) articles The articles will contain properties such as id, title and category. Hopefully this will get you inspired to create more similar improved projects, also, note that there is no security thinking here, this is just to show how to get started with Angular 10 and MySQL.
First create a fresh directory for your app named anything you want, I’m going with “myapp” as name. In here we will create an Angular app.
Verify that you your Angular version is not too old, we are using Angular 10 for this project.
ng --version
If you are not too far from version 10 you can probably just simply do the ng update like this, if you still have problems check out the Angular Update Guide here.
ng update @angular/core @angular/cli
If you don’t have Angular installed at all, run the command
npm install -g @angular/cli
Create your Angular project
ng new myapp
I am going to go with yes on routing and CSS as preferred styling syntax. If you don’t have angular installed, please install it first by running the command npm install -g @angular/cli.
So when you have created your angular app with the ng new myapp command, let’s check that it is alive and well, go to your folder with the cd command.
cd .\myapp
Now in your app directory, run your application with the serve angular command.
ng serve
Create a Node.js Server
Great it looks good! Next step is to go back to your main directory with the cd command and create a server folder with the mkdir command. This is going to be the back-end, the nodejs folder.
cd ..
mkdir server
Now we have a server folder and a myapp folder. Jump into the folder and create a server.js file. In this file,
let app = require('express')(),
    server = require('http').Server(app),
    bodyParser = require('body-parser')
express = require('express'),
    cors = require('cors'),
    http = require('http'),
    path = require('path');

let articleRoute = require('./Routes/article'),
    util = require('./Configurations/utils');

app.use(bodyParser.json());
app.use(bodyParser.urlencoded({ extended: false }));

app.use(cors());

app.use(function (err, req, res, next) {
    return res.send({ "statusCode": util.statusCode.ONE, "statusMessage": util.statusMessage.SOMETHING_WENT_WRONG });
});

app.use('/article', articleRoute);

// catch 404 and forward to error handler
app.use(function (req, res, next) {
    next();
});

server.listen(3000, function () {
    console.log('app listening on port: 3000');
});
What we are doing
We are running a nodejs express server here on port 3000. We also define that on the URL /article we want to use the articleRoute object. In the top of the file we have imported this object in ./Routes/article. We also have our util object at ./Configurations/utils to send statusCodes. We will create these folders and files shortly!
Now let’s install the dependencies from our newly created server.js
npm i express http body-parser cors http path
Hopefully I didn’t miss any dependency, but you will notice if it fails to run later on.
Now create another directory called Routes inside the server folder, and inside the Routes folder create a file called article.js
let express = require('express'),
    router = express.Router(),
    util = require('../Configurations/utils'),
    articleService = require('../service/article');

/**Api to create article */
router.post('/create-article', (req, res) => {
    console.log(req)
    articleService.createArticle(req.body, (data) => {
        res.send(data);
    });
});

// /**Api to update article */
router.put('/update-article', (req, res) => {
    articleService.updateArticle(req.body, (data) => {
        res.send(data);
    });
});

// /**Api to delete the article */
router.delete('/delete-article', (req, res) => {
    articleService.deleteArticle(req.query, (data) => {
        res.send(data);
    });
});

/**Api to get the list of article */
router.get('/get-article', (req, res) => {
    articleService.getArticle(req.query, (data) => {
        res.send(data);
    });
});

// /**API to get the article by id... */
router.get('/get-article-by-id', (req, res) => {
    articleService.getArticleById(req.query, (data) => {
        res.send(data);
    });
});

module.exports = router;
Install the dependencies
npm i async xml2js
With this routing file we now have some API routes for our articles in our database. Don’t worry about the database yet, we will come to that.
Now create another folder inside the server folder called Configurations and inside it, create a file called config.js.
let environment = "dev";

let serverURLs = {
    "dev": {
        "NODE_SERVER": "http://localhost",
        "NODE_SERVER_PORT": "3000",
        "MYSQL_HOST": 'localhost',
        "MYSQL_USER": 'root',
        "MYSQL_PASSWORD": 'password',
        'MYSQL_DATABASE': 'mydb',
    }
}

let config = {
    "DB_URL_MYSQL": {
        "host": `${serverURLs[environment].MYSQL_HOST}`,
        "user": `${serverURLs[environment].MYSQL_USER}`,
        "password": `${serverURLs[environment].MYSQL_PASSWORD}`,
        "database": `${serverURLs[environment].MYSQL_DATABASE}`
    },
    "NODE_SERVER_PORT": {
        "port": `${serverURLs[environment].NODE_SERVER_PORT}`
    },
    "NODE_SERVER_URL": {
        "url": `${serverURLs[environment].NODE_SERVER}`
    }
};

module.exports = {
    config: config
};
Next up, create a mysqlconfig.js file inside the Configurations folder.
var config = require("../Configurations/config").config;
var mysql = require('mysql');
var connection = mysql.createConnection({
    host: config.DB_URL_MYSQL.host,
    user: config.DB_URL_MYSQL.user,
    password: config.DB_URL_MYSQL.password,
    database: config.DB_URL_MYSQL.database,
});

connection.connect((er) => {
    console.log(er)
});

let getDB = () => {
    return connection;
}

module.exports = {
    getDB: getDB
}
Remember to install the mysql dependency
npm i mysql
Next create a utils.js file, still inside the Configurations folder. We will define some status messages.
// Define Error Codes
let statusCode = {
    OK: 200,
    FOUR_ZERO_FOUR: 404,
    FOUR_ZERO_THREE: 403,
    FOUR_ZERO_ONE: 401,
    FIVE_ZERO_ZERO: 500
};

// Define Error Messages
let statusMessage = {
    SERVER_BUSY: 'Our Servers are busy. Please try again later.',
    DATA_UPDATED: 'Data updated successfully.',
    DELETE_DATA: 'Delete data successfully',

};

module.exports = {
    statusCode: statusCode,
    statusMessage: statusMessage
}
Now create a new DAO folder in the server folder to handle the SQL queries and add a file called articleDAO.js inside it.
let dbConfig = require("../Configurations/mysqlconnection");

let getArticle = (criteria, callback) => {
    //criteria.aricle_id ? conditions += ` and aricle_id = '${criteria.aricle_id}'` : true;
    dbConfig.getDB().query(`select * from article where 1`, criteria, callback);
}

let getArticleDetail = (criteria, callback) => {
    let conditions = "";
    criteria.id ? conditions += ` and id = '${criteria.id}'` : true;
    dbConfig.getDB().query(`select * from article where 1 ${conditions}`, callback);
}

let createArticle = (dataToSet, callback) => {
    console.log("insert into article set ? ", dataToSet, 'fileidea')
    dbConfig.getDB().query("insert into article set ? ", dataToSet, callback);
}

let deleteArticle = (criteria, callback) => {
    let conditions = "";
    criteria.id ? conditions += ` and id = '${criteria.id}'` : true;
    console.log(`delete from article where 1 ${conditions}`);
    dbConfig.getDB().query(`delete from article where 1 ${conditions}`, callback);

}

let updateArticle = (criteria, dataToSet, callback) => {
    let conditions = "";
    let setData = "";
    criteria.id ? conditions += ` and id = '${criteria.id}'` : true;
    dataToSet.category ? setData += `category = '${dataToSet.category}'` : true;
    dataToSet.title ? setData += `, title = '${dataToSet.title}'` : true;
    console.log(`UPDATE article SET ${setData} where 1 ${conditions}`);
    dbConfig.getDB().query(`UPDATE article SET ${setData} where 1 ${conditions}`, callback);
}
module.exports = {
    getArticle: getArticle,
    createArticle: createArticle,
    deleteArticle: deleteArticle,
    updateArticle: updateArticle,
    getArticleDetail: getArticleDetail
}
Create a service folder inside the server folder now and add a file called article.js.
let async = require('async'),
    parseString = require('xml2js').parseString;

let util = require('../Configurations/utils'),
    articleDAO = require('../DAO/articleDAO');

/* Creating a new article */
let createArticle = (data, callback) => {
    async.auto({
        article: (cb) => {
            var dataToSet = {
                "category": data.category ? data.category : '',
                "title": data.title,
            }
            console.log(dataToSet);
            articleDAO.createArticle(dataToSet, (err, dbData) => {
                if (err) {
                    cb(null, { "statusCode": util.statusCode.FOUR_ZERO_ONE, "statusMessage": util.statusMessage.SERVER_BUSY });
                    return;
                }

                cb(null, { "statusCode": util.statusCode.OK, "statusMessage": util.statusMessage.DATA_UPDATED, "result": dataToSet });
            });
        }
        //]
    }, (err, response) => {
        callback(response.article);
    });
}

/* Update an article */
let updateArticle = (data, callback) => {
    async.auto({
        articleUpdate: (cb) => {
            if (!data.id) {
                cb(null, { "statusCode": util.statusCode.FOUR_ZERO_ONE, "statusMessage": util.statusMessage.PARAMS_MISSING })
                return;
            }
            console.log('phase 1');
            var criteria = {
                id: data.id,
            }
            var dataToSet = {
                "category": data.category,
                "title": data.title,
            }
            console.log(criteria, 'test', dataToSet);
            articleDAO.updateArticle(criteria, dataToSet, (err, dbData) => {
                if (err) {
                    cb(null, { "statusCode": util.statusCode.FOUR_ZERO_ONE, "statusMessage": util.statusMessage.SERVER_BUSY });
                    return;
                }
                else {
                    cb(null, { "statusCode": util.statusCode.OK, "statusMessage": util.statusMessage.DATA_UPDATED, "result": dataToSet });
                }
            });
        }
    }, (err, response) => {
        callback(response.articleUpdate);
    });
}

/* Delete an article */
let deleteArticle = (data, callback) => {
    console.log(data, 'data to set')
    async.auto({
        removeArticle: (cb) => {
            if (!data.id) {
                cb(null, { "statusCode": util.statusCode.FOUR_ZERO_ONE, "statusMessage": util.statusMessage.PARAMS_MISSING })
                return;
            }
            var criteria = {
                id: data.id,
            }
            articleDAO.deleteArticle(criteria, (err, dbData) => {
                if (err) {
                    console.log(err);
                    cb(null, { "statusCode": util.statusCode.FOUR_ZERO_ONE, "statusMessage": util.statusMessage.SERVER_BUSY });
                    return;
                }
                cb(null, { "statusCode": util.statusCode.OK, "statusMessage": util.statusMessage.DELETE_DATA });
            });
        }
    }, (err, response) => {
        callback(response.removeArticle);
    });
}

/* Get all articles  */
let getArticle = (data, callback) => {
    async.auto({
        article: (cb) => {
            articleDAO.getArticle({}, (err, data) => {
                if (err) {
                    cb(null, { "errorCode": util.statusCode.INTERNAL_SERVER_ERROR, "statusMessage": util.statusMessage.SERVER_BUSY });
                    return;
                }
                cb(null, data);
                return;
            });
        }
    }, (err, response) => {
        callback(response.article);
    })
}

/* Get article by Id */
let getArticleById = (data, callback) => {
    async.auto({
        article: (cb) => {
            let criteria = {
                "id": data.id
            }
            articleDAO.getArticleDetail(criteria, (err, data) => {
                if (err) {
                    console.log(err, 'error----');
                    cb(null, { "errorCode": util.statusCode.INTERNAL_SERVER_ERROR, "statusMessage": util.statusMessage.SERVER_BUSY });
                    return;
                }
                cb(null, data[0]);
                return;
            });
        }
    }, (err, response) => {
        callback(response.article);
    })
}

module.exports = {
    createArticle: createArticle,
    updateArticle: updateArticle,
    deleteArticle: deleteArticle,
    getArticle: getArticle,
    getArticleById: getArticleById
};
Now we have a full service for the full article object in our database utilising the articleDAO.js file which works like an interface for our service.
To start your server run node server.js inside your server folder. It will be hosted on localhost:3000. Also since we haven’t made any settings to the database yet you will get database errors if you are trying to get any articles through your API.
Proceed with Angular app
Our nodejs express server is now pretty much done! In the end we will we will adjust the database settings if you haven’t already done it. Now let’s go back to the angular application folder (myapp) in the terminal. Then generate a component with the angular command.
ng g component article
Bam! We got a component ready to do stuff with. Now to communicate with our back-end service, we can use the HttpClientModule from Angular. Let’s add it to our angular app inside app.module.ts. Open and edit it and add the HttpClientModule to the imports. We also want to add ReactiveFormsModule and FormsModule because we will use formGroup soon in our component. Note that the generate command already added our ArticleComponent to the module. We will also add ArticleService, which we will add in the next step, so expect an error here.
My app.module.ts looks like this now:
import { BrowserModule } from '@angular/platform-browser';
import { NgModule } from '@angular/core';

import { AppRoutingModule } from './app-routing.module';
import { AppComponent } from './app.component';
import { ArticleComponent } from './article/article.component';
import { HttpClientModule } from '@angular/common/http';
import { ArticleService } from './article.service';
import { HttpModule } from '@angular/http';
import { CommonModule } from '@angular/common';
import { ReactiveFormsModule, FormsModule } from '@angular/forms';

@NgModule({
  declarations: [
    AppComponent,
    ArticleComponent
  ],
  imports: [
    BrowserModule,
    AppRoutingModule,
    HttpClientModule,
    HttpModule,
    CommonModule,
    ReactiveFormsModule
  ],
  exports: [
    CommonModule,
    FormsModule,
    ReactiveFormsModule
  ],
  providers: [ArticleService],
  bootstrap: [AppComponent]
})
export class AppModule { }
Now let’s add an Article class/model that we will use whenever doing things with our articles. Create a folder Models in your app folder, and in it, create a file called article.model.ts. Here we can add as many properties as we want, but first of all, we need to include the ones that will be in the database table.
export class Article {
    id: number
    title: string
    category: string
}
Now we need a service which can talk to the back-end. Run the Angular command to create a service with the following in your angular project folder.
ng g service article
Open up the generated article.service.ts file and add
import { Injectable } from '@angular/core';
import { Http, Response, Headers, RequestOptions } from '@angular/http';
import { Observable, pipe, of } from 'rxjs';
import { map, catchError } from 'rxjs/operators';
import { Article } from './model/article.model';


@Injectable()
export class ArticleService {
  // URL for CRUD operations
  articleUrl = "http://localhost:3000/article";
  // Create constructor to get Http instance
  constructor(private http: Http) {
  }

  // Fetch all articles
  getAllArticles(): Observable<Article[]> {
    return this.http.get(this.articleUrl + "/get-article")
      .pipe(map(this.extractData))

  }
  // Create article
  createArticle(article: Article): Observable<number> {
    let cpHeaders = new Headers({ 'Content-Type': 'application/json' });
    let options = new RequestOptions({ headers: cpHeaders });
    console.log(article)
    return this.http.post(this.articleUrl + "/create-article", article, options)
      .pipe(
        map(success => success.status)
      )
  }
  // Fetch article by id
  getArticleById(articleId: string): Observable<Article> {
    let cpHeaders = new Headers({ 'Content-Type': 'application/json' });
    let options = new RequestOptions({ headers: cpHeaders });
    console.log(this.articleUrl + "/get-article-by-id?id=" + articleId);
    return this.http.get(this.articleUrl + "/get-article-by-id?id=" + articleId)
      .pipe(map(this.extractData))
  }
  // Update article
  updateArticle(article: Article): Observable<number> {
    let cpHeaders = new Headers({ 'Content-Type': 'application/json' });
    let options = new RequestOptions({ headers: cpHeaders });
    return this.http.put(this.articleUrl + "/update-article", article, options)
      .pipe(map(success => success.status))
  }
  // Delete article
  deleteArticleById(articleId: string): Observable<number> {
    let cpHeaders = new Headers({ 'Content-Type': 'application/json' });
    let options = new RequestOptions({ headers: cpHeaders });
    return this.http.delete(this.articleUrl + "/delete-article?id=" + articleId)
      .pipe(map(success => success.status))

  }
  private extractData(res: Response) {
    let body = res.json();
    return body;
  }
  private handleError(error: Response | any) {
    console.error(error.message || error);
    return Observable.throw(error.status);
  }
}
Great we got the service down to talk with our back-end.
Let’s start using the service, open up the article.component.ts file and add:
import { Component, OnInit } from '@angular/core';
import { FormControl, FormGroup, Validators } from '@angular/forms';
import { Article } from '../model/article.model';
import { ArticleService } from '../article.service'

@Component({
  selector: 'app-article',
  templateUrl: './article.component.html',
  styleUrls: ['./article.component.css']
})
export class ArticleComponent implements OnInit {
  //Component properties
  allArticles: Article[];
  statusCode: number;
  requestProcessing = false;
  articleIdToUpdate = null;
  processValidation = false;
  //Create form
  articleForm = new FormGroup({
    title: new FormControl('', Validators.required),
    category: new FormControl('', Validators.required)
  });
  //Create constructor to get service instance
  constructor(private articleService: ArticleService) {
  }
  //Create ngOnInit() and and load articles
  ngOnInit(): void {
    this.getAllArticles();
  }

  //Fetch all articles
  getAllArticles() {
    this.articleService.getAllArticles()
      .subscribe(
        data => this.allArticles = data,
        errorCode => this.statusCode = errorCode);

  }
  //Handle create and update article
  onArticleFormSubmit() {
    this.processValidation = true;
    if (this.articleForm.invalid) {
      return; //Validation failed, exit from method.
    }
    //Form is valid, now perform create or update
    this.preProcessConfigurations();
    let article = this.articleForm.value;
    console.log(article)
    if (this.articleIdToUpdate === null) {
      //Generate article id then create article
      this.articleService.getAllArticles()
        .subscribe(articles => {
          let articleId = 0
          //Generate article id
          if (articles.length > 0) {
            let maxIndex = articles.length - 1;

            let articleWithMaxIndex = articles[maxIndex];
            articleId = articleWithMaxIndex.id + 1;
          }
          article.id = articleId;
          console.log(article, 'this is form data---');
          //Create article
          this.articleService.createArticle(article)
            .subscribe(successCode => {
              this.statusCode = successCode;
              this.getAllArticles();
              this.backToCreateArticle();
            },
              errorCode => this.statusCode = errorCode
            );
        });
    } else {
      //Handle update article
      article.id = this.articleIdToUpdate;
      this.articleService.updateArticle(article)
        .subscribe(successCode => {
          this.statusCode = successCode;
          this.getAllArticles();
          this.backToCreateArticle();
        },
          errorCode => this.statusCode = errorCode);
    }
  }
  //Load article by id to edit
  loadArticleToEdit(articleId: string) {
    this.preProcessConfigurations();
    this.articleService.getArticleById(articleId)
      .subscribe(article => {
        console.log(article, 'poiuytre');
        this.articleIdToUpdate = article.id;
        this.articleForm.setValue({ title: article.title, category: article.category });
        this.processValidation = true;
        this.requestProcessing = false;
      },
        errorCode => this.statusCode = errorCode);
  }
  //Delete article
  deleteArticle(articleId: string) {
    this.preProcessConfigurations();
    this.articleService.deleteArticleById(articleId)
      .subscribe(successCode => {
        //this.statusCode = successCode;
        //Expecting success code 204 from server
        this.statusCode = 204;
        this.getAllArticles();
        this.backToCreateArticle();
      },
        errorCode => this.statusCode = errorCode);
  }
  //Perform preliminary processing configurations
  preProcessConfigurations() {
    this.statusCode = null;
    this.requestProcessing = true;
  }
  //Go back from update to create
  backToCreateArticle() {
    this.articleIdToUpdate = null;
    this.articleForm.reset();
    this.processValidation = false;
  }
}
To keep it simple we will run a getAllArticles method to get all articles whenever the component is initialised. Now let us create the component html. Open up article.component.html and add:
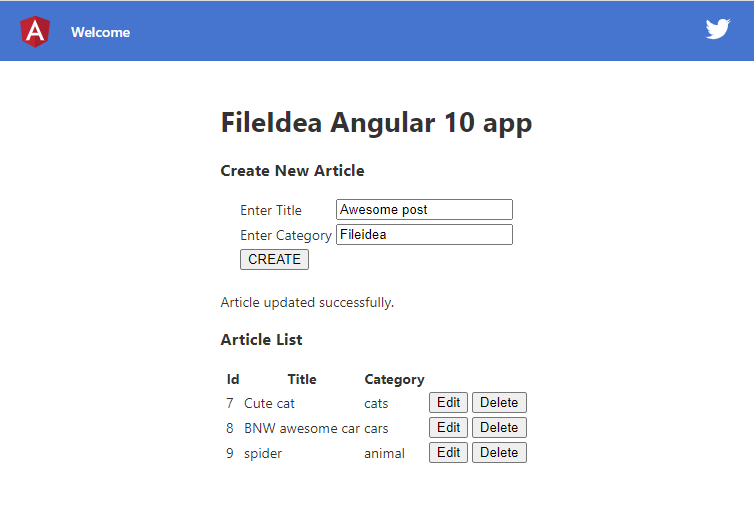
<h1 class="text-center">FileIdea Angular 10 app</h1>
<h3 class="text-center" *ngIf="articleIdToUpdate; else create">
    Update Article for Id: {{articleIdToUpdate}}
</h3>
<ng-template #create>
    <h3 class="text-center"> Create New Article </h3>
</ng-template>
<div>
    <form [formGroup]="articleForm" (ngSubmit)="onArticleFormSubmit()">
        <table class="table-striped" style="margin:0 auto;">
            <tr>
                <td>Enter Title</td>
                <td><input formControlName="title">
                    <label *ngIf="articleForm.get('title').invalid && processValidation" [ngClass]="'error'"> Title is
                        required. </label>
                </td>
            </tr>
            <tr>
                <td>Enter Category</td>
                <td><input formControlName="category">
                    <label *ngIf="articleForm.get('category').invalid && processValidation" [ngClass]="'error'">
                        Category is required. </label>
                </td>
            </tr>
            <tr>
                <td colspan="2">
                    <button class="btn btn-default" *ngIf="!articleIdToUpdate">CREATE</button>
                    <button class="btn btn-default" *ngIf="articleIdToUpdate">UPDATE</button>
                    <button (click)="backToCreateArticle()" *ngIf="articleIdToUpdate">Go Back</button>
                </td>
            </tr>
        </table>
    </form>
    <br />
    <div class="text-center" *ngIf="statusCode; else processing">
        <div *ngIf="statusCode === 201" [ngClass]="'success'">
            Article added successfully.
        </div>
        <div *ngIf="statusCode === 409" [ngClass]="'success'">
            Article already exists.
        </div>
        <div *ngIf="statusCode === 200" [ngClass]="'success'">
            Article updated successfully.
        </div>
        <div *ngIf="statusCode === 204" [ngClass]="'success'">
            Article deleted successfully.
        </div>
        <div *ngIf="statusCode === 500" [ngClass]="'error'">
            Internal Server Error.
        </div>
    </div>
    <ng-template #processing>
        <!-- <img *ngIf="requestProcessing" src="assets/images/loading.gif"> -->
        <p *ngIf="requestProcessing">Loading</p>
    </ng-template>
</div>
<h3 class="text-center">Article List</h3>
<table class="table-striped" style="margin:0 auto;" *ngIf="allArticles">
    <tr>
        <th> Id</th>
        <th>Title</th>
        <th>Category</th>
        <th></th>
        <th></th>
    </tr>
    <tr *ngFor="let article of allArticles">
        <td>{{article.id}}</td>
        <td>{{article.title}}</td>
        <td>{{article.category}}</td>
        <td><button class="btn btn-default" type="button" (click)="loadArticleToEdit(article.id)">Edit</button> </td>
        <td><button class="btn btn-default" type="button" (click)="deleteArticle(article.id)">Delete</button></td>
    </tr>
</table>
Okay we got a back end server, a service in our Angular app, and markup for our component. What is next? Well let us add the new component to our app.component.html. You can remove everything there and replace it with <app-article></app-article> if you want. I am actually going to keep the sample CSS because I like what they have going on with the blue top bar, and then I’ll put my component element inside the content class they already made, and keep router-outlet in the bottom. In the end, my app.component.html looks like this.
<style>
  :host {
    font-family: -apple-system, BlinkMacSystemFont, "Segoe UI", Roboto, Helvetica, Arial, sans-serif, "Apple Color Emoji", "Segoe UI Emoji", "Segoe UI Symbol";
    font-size: 14px;
    color: #333;
    box-sizing: border-box;
    -webkit-font-smoothing: antialiased;
    -moz-osx-font-smoothing: grayscale;
  }

  h1,
  h2,
  h3,
  h4,
  h5,
  h6 {
    margin: 8px 0;
  }

  p {
    margin: 0;
  }

  .spacer {
    flex: 1;
  }

  .toolbar {
    position: absolute;
    top: 0;
    left: 0;
    right: 0;
    height: 60px;
    display: flex;
    align-items: center;
    background-color: #1976d2;
    color: white;
    font-weight: 600;
  }

  .toolbar img {
    margin: 0 16px;
  }

  .toolbar #twitter-logo {
    height: 40px;
    margin: 0 16px;
  }

  .toolbar #twitter-logo:hover {
    opacity: 0.8;
  }

  .content {
    display: flex;
    margin: 82px auto 32px;
    padding: 0 16px;
    max-width: 960px;
    flex-direction: column;
    align-items: center;
  }

  svg.material-icons {
    height: 24px;
    width: auto;
  }

  svg.material-icons:not(:last-child) {
    margin-right: 8px;
  }


  svg#clouds {
    position: fixed;
    bottom: -160px;
    left: -230px;
    z-index: -10;
    width: 1920px;
  }


  /* Responsive Styles */
  @media screen and (max-width: 767px) {

    .card-container>*:not(.circle-link),
    .terminal {
      width: 100%;
    }

    .card:not(.highlight-card) {
      height: 16px;
      margin: 8px 0;
    }

    .card.highlight-card span {
      margin-left: 72px;
    }

    svg#rocket-smoke {
      right: 120px;
      transform: rotate(-5deg);
    }
  }

  @media screen and (max-width: 575px) {
    svg#rocket-smoke {
      display: none;
      visibility: hidden;
    }
  }
</style>


<!-- Toolbar -->
<div class="toolbar" role="banner">
  <img width="40" alt="Angular Logo"
    src="data:image/svg+xml;base64,PHN2ZyB4bWxucz0iaHR0cDovL3d3dy53My5vcmcvMjAwMC9zdmciIHZpZXdCb3g9IjAgMCAyNTAgMjUwIj4KICAgIDxwYXRoIGZpbGw9IiNERDAwMzEiIGQ9Ik0xMjUgMzBMMzEuOSA2My4ybDE0LjIgMTIzLjFMMTI1IDIzMGw3OC45LTQzLjcgMTQuMi0xMjMuMXoiIC8+CiAgICA8cGF0aCBmaWxsPSIjQzMwMDJGIiBkPSJNMTI1IDMwdjIyLjItLjFWMjMwbDc4LjktNDMuNyAxNC4yLTEyMy4xTDEyNSAzMHoiIC8+CiAgICA8cGF0aCAgZmlsbD0iI0ZGRkZGRiIgZD0iTTEyNSA1Mi4xTDY2LjggMTgyLjZoMjEuN2wxMS43LTI5LjJoNDkuNGwxMS43IDI5LjJIMTgzTDEyNSA1Mi4xem0xNyA4My4zaC0zNGwxNy00MC45IDE3IDQwLjl6IiAvPgogIDwvc3ZnPg==" />
  <span>Welcome</span>
  <div class="spacer"></div>
  <a aria-label="Angular on twitter" target="_blank" rel="noopener" href="https://twitter.com/angular" title="Twitter">
    <svg id="twitter-logo" height="24" data-name="Logo" xmlns="http://www.w3.org/2000/svg" viewBox="0 0 400 400">
      <rect width="400" height="400" fill="none" />
      <path
        d="M153.62,301.59c94.34,0,145.94-78.16,145.94-145.94,0-2.22,0-4.43-.15-6.63A104.36,104.36,0,0,0,325,122.47a102.38,102.38,0,0,1-29.46,8.07,51.47,51.47,0,0,0,22.55-28.37,102.79,102.79,0,0,1-32.57,12.45,51.34,51.34,0,0,0-87.41,46.78A145.62,145.62,0,0,1,92.4,107.81a51.33,51.33,0,0,0,15.88,68.47A50.91,50.91,0,0,1,85,169.86c0,.21,0,.43,0,.65a51.31,51.31,0,0,0,41.15,50.28,51.21,51.21,0,0,1-23.16.88,51.35,51.35,0,0,0,47.92,35.62,102.92,102.92,0,0,1-63.7,22A104.41,104.41,0,0,1,75,278.55a145.21,145.21,0,0,0,78.62,23"
        fill="#fff" />
    </svg>
  </a>
</div>

<div class="content" role="main">
  <!-- Article Component -->
  <app-article></app-article>

</div>


<router-outlet></router-outlet>
MySQL
To get the MySQL working, open up our favourite tool. I am using XAMPP which has phpmyadmin for MySQL which never seems to have any problems. Download it here. Start your Apache (you might need to change port) and MySQL and click on the admin button to view the phpmyadmin page.
Once you are in phpmyadmin, create a database and in it, create a article table. My phpmyadmin looks like this now.
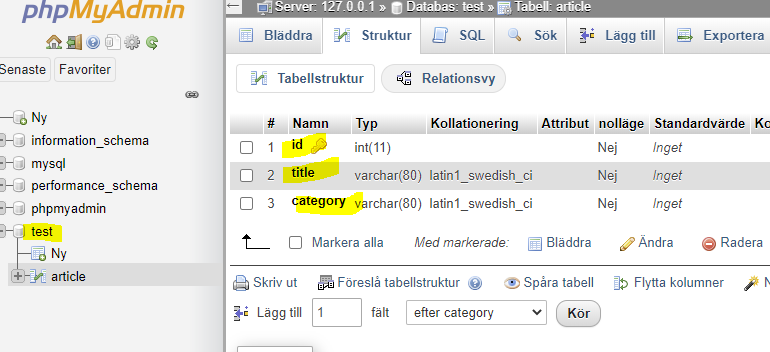
CREATE TABLE `article` (
  `id` int(11) NOT NULL,
  `title` varchar(80) NOT NULL,
  `category` varchar(80) NOT NULL
) ENGINE=InnoDB DEFAULT CHARSET=latin1;


ALTER TABLE `article`
  ADD PRIMARY KEY (`id`);


ALTER TABLE `article`
  MODIFY `id` int(11) NOT NULL AUTO_INCREMENT;
If you are feeling copy-pasty you can run the sql above to your test database or whatever you called it. Now we need to update our sql database settings in our server, inside the config.js inside the Configurations folder. Now I have a test database server and running this on localhost, I do not have a password. This is how my config.js looks like
let environment = "dev";

let serverURLs = {
    "dev": {
        "NODE_SERVER": "http://localhost",
        "NODE_SERVER_PORT": "3306",
        "MYSQL_HOST": '127.0.0.1',
        "MYSQL_USER": 'root',
        "MYSQL_PASSWORD": '',
        'MYSQL_DATABASE': 'test',
    }
}

let config = {
    "DB_URL_MYSQL": {
        "host": `${serverURLs[environment].MYSQL_HOST}`,
        "user": `${serverURLs[environment].MYSQL_USER}`,
        "password": `${serverURLs[environment].MYSQL_PASSWORD}`,
        "database": `${serverURLs[environment].MYSQL_DATABASE}`
    },
    "NODE_SERVER_PORT": {
        "port": `${serverURLs[environment].NODE_SERVER_PORT}`
    },
    "NODE_SERVER_URL": {
        "url": `${serverURLs[environment].NODE_SERVER}`
    }
};

module.exports = {
    config: config
};
Mission Complete
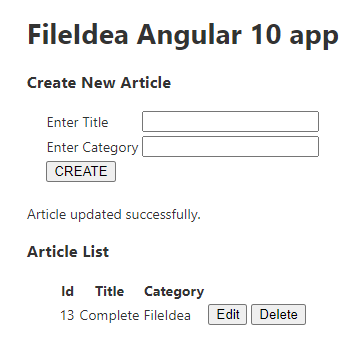
You should now have a app that uses MySQL with Angular 10! Open up your Angular app on localhost:4200 and behold the beauty and start inserting new rows into your article table.
Latest Comments