
The goal here is to create a dynamic navigational Flutter draw menu and then have menu items being added through the data coming from a http GET call. Then have each item refer to a route using their unique id.
We will first create the menu, then add some static items, then take use of a local List, then see how you can add elements to that list with a simple click. Then we see how we can make the HTTP call and take that data to make menu items. Then what we can do to display data from an id coming in to the route after clicking on a menu item. We’ll keep everything very simple go from the beginning when creating a new project.
If you don’t have the Flutter extension for VS code, please do the following in VS Code:
Invoke View > Command Palette….
Type “install”, and select Extensions: Install Extensions.
Type “flutter” in the extensions search field, select Flutter in the list, and click Install. This also installs the required Dart plugin.
I will now create a new project by pressing CTRL+SHIFT+P to get to the command window and enter Flutter and choose New Project, enter my project name and then Enter. Visual Code will then create our Flutter project and we are ready to go! First of all, I am just going to test run my application. Using Android Studio to have my Emulator ready and run.
flutter run
Takes a while to build, specially the first time.
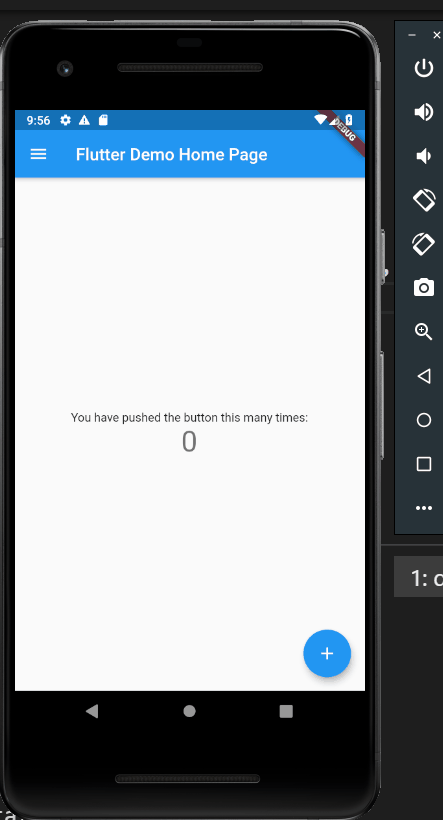
Then we can see our application is alive and well. Thanks to the default code we already got some things we can use, so I will not touch anything and simply just add a drawer property to the already defined _MyHomePageState under class _MyHomePageState extends State<MyHomePage> {.
- Add a drawer to the Widget under _MyHomePageState after the body property.
class _MyHomePageState extends State<MyHomePage> {
  int _counter = 0;

  void _incrementCounter() {
    setState(() {
      _counter++;
    });
  }

  @override
  Widget build(BuildContext context) {
    return Scaffold(
      appBar: AppBar(
        title: Text(widget.title),
      ),
      body: Center(
        child: Column(
          mainAxisAlignment: MainAxisAlignment.center,
          children: <Widget>[
            Text(
              'You have pushed the button this many times:',
            ),
            Text(
              '$_counter',
              style: Theme.of(context).textTheme.headline4,
            ),
          ],
        ),
      ),
      drawer: Drawer(
        // We will get a ListView to show menu items here
      ),
      floatingActionButton: FloatingActionButton(
        onPressed: _incrementCounter,
        tooltip: 'Increment',
        child: Icon(Icons.add),
      ), // This trailing comma makes auto-formatting nicer for build methods.
    );
  }
}
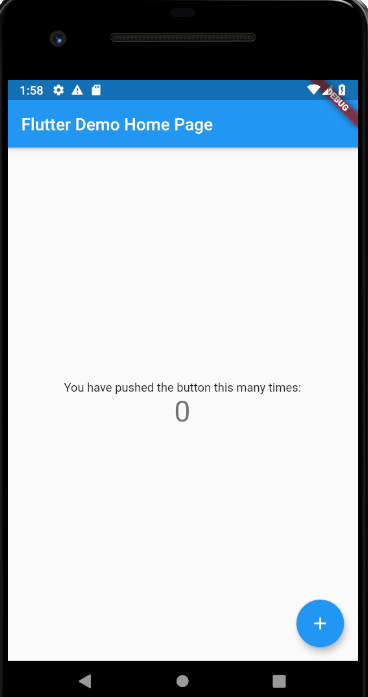
Great we have now added a drawer property along with an empty Drawer(). Hot reload (press R) and we can see the draw menu is there!
2. Add Widgets to the ListView.
Okay we got the menu but no items. Let’s add them. We can do that by defining a child property to the drawer saying what things should be there, and we will define a ListView which we will define children for.
First off let’s add a DrawerHeader like this. I am showing the drawer property code from now on.
 drawer: Drawer(
          child: ListView(
        padding: EdgeInsets.zero,
        children: <Widget>[
          DrawerHeader(
              child: Text('Drawer Header'),
              decoration: BoxDecoration(
                color: Colors.blue,
              ))
        ],
      )),

Do a hot reload and we can see the the head in blue with black text when opening up the drawer.
Then add two more Widgets (items).
drawer: Drawer(
          child: ListView(
        padding: EdgeInsets.zero,
        children: <Widget>[
          DrawerHeader(
              child: Text('Drawer Header'),
              decoration: BoxDecoration(
                color: Colors.blue,
              )),
          ListTile(
            title: Text('Item 1'),
            onTap: () {
              // Update the state of the app
              // ...
              // Then close the drawer
              Navigator.pop(context);
            },
          ),
          ListTile(
            title: Text('Item 2'),
            onTap: () {
              // Update the state of the app
              // ...
              // Then close the drawer
              Navigator.pop(context);
            },
          ),
        ],
      ))
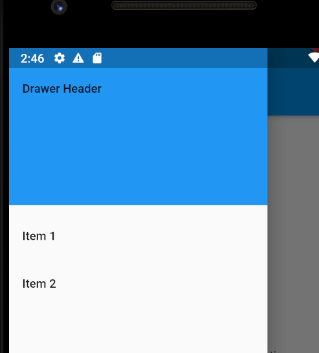
Neat we got some items, Drawer Header, Item 1 and Item 2. Nothing happens when we click but they are there. Now, we still have that plus icon along with the increment function to list amount of clicks from the demo/sample/default code right? What if use this to add items to an list have created and use that for displaying the items in the menu.
3. Create a List of menu items
So we know that the drawer uses ListTile Widgets for their menu items. Let’s create a local list of that straight under the _counter property.
List<Widget> listOfItems = new List<Widget>();
Okay we have a new property called listOfItems. Let’s try remove what we did before and insert our list there directory along with an add to list method in the _incrementalCounter(). So first let’s add the list like this replacing our previous static items:
drawer: Drawer(
        child: ListView(
        padding: EdgeInsets.zero,
        children: this.listOfItems,
      )),
Then we will continue to add some code for adding to the list under the _incrementalCounter() method here:
  void _incrementCounter() {
    setState(() {
      _counter++;
      this.listOfItems.add(ListTile(
            title: Text('Item'),
            onTap: () {
              // Update the state of the app
              // ...
              // Then close the drawer
              Navigator.pop(context);
            },
          ));
    });
  }
Now when we click the plus button we will add a new item to the menu!
So we’ve demonstrated and seen that it is possible to add items to the menu list and change it dynamically! Let’s take this a step further and add data from a http call which is used to fill the menu items that way instead. However, first, since it doesn’t happen anything when we click. Let’s add that functionality as well, we want to get to a new page when we click on the menu item. We want information about the item. We can achive this by having a widget which returns a scaffold with some information which navigate to when click on an item.
Create a stateless widget
I am now going to create a stateless widget with the name MenuItemPage
class MenuItemPage extends StatelessWidget {
  const MenuItemPage({Key key}) : super(key: key);

  @override
  Widget build(BuildContext context) {
    return Container(
      child: Center(),
    );
  }
}
You’ll see where we are going with this right? This is the widget we are going to navigate to when item is pressed. This means we should have some kind of id passed along. Lets add this.
class MenuItemPage extends StatelessWidget {
  const MenuItemPage({Key key}) : super(key: key);
  final int id = 0;

  @override
  Widget build(BuildContext context) {
    return Container(
      child: Center(),
    );
  }
}
If we were to render this widget it would be kind of boring with nothing to display so let’s add a whole Scaffold.
class MenuItemPage extends StatelessWidget {
  const MenuItemPage({Key key, this.id}) : super(key: key);
  final int id;

  @override
  Widget build(BuildContext context) {
    return Scaffold(
      appBar: AppBar(
        title: Text("Another Page"),
      ),
      body: Center(
          child: Text(
        'Viewing Menu Item Page with ID $id',
        textAlign: TextAlign.center,
        overflow: TextOverflow.ellipsis,
        style: TextStyle(fontWeight: FontWeight.bold),
      )),
    );
  }
}
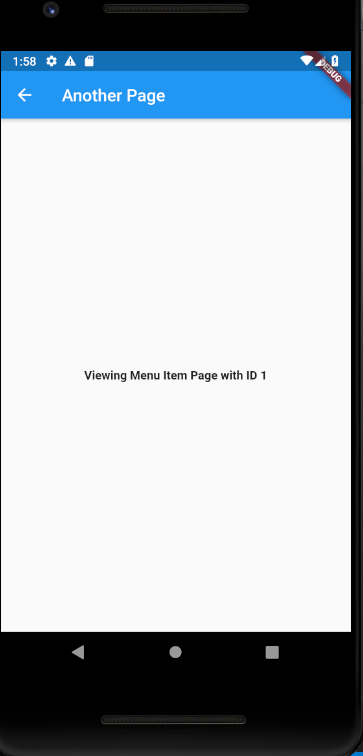
We have now added a Scaffold and made so that id is a parameter.
And then lets make it possible to navigate to our Widget like this:
66this.listOfItems.add(ListTile(
            title: Text('Item'),
            onTap: () {
              Navigator.push(
                context,
                MaterialPageRoute(builder: (context) => MenuItemPage(id: 1)),
              );
            },
          ));
    });
Result looks like this after we clicked the plus and then clicked on the item
Great, we got the whole idea of how it should work. Now we want to add some real data.
4. Get menu items from an external resource – Add http
Let’s add the http flutter library by adding http in our pubspec.yaml file under dependencies under flutter
http: ^0.12.2
Also add permissions like this to your AndroidManifest.xml file
<uses-permission android:name="android.permission.INTERNET" />
Then import http in your main.dart file at the top
import 'package:http/http.dart' as http;
4. Add a Future
Okay now we are ready to use http! Http means we are going to work with asynchronous data so let’s add a Future like this:
Future<http.Response> getMenuItems() async {
  final response = await http.get('https://jsonplaceholder.typicode.com/todos');
  return response;
}
Now if you have some better data source and your own you can feel free to replace this but jsonplaceholder.typicode.com got some nice sample data and how it looks isn’t that important so the todo objects will work for this example! So pretend “todos” is menu items here.
What we do here is that we declare a Future with the http.Response type and make it async because http.get() will do an asynchronous call. We wait for it is done and save the value into a final variable. Then we simply return it. Try visit https://jsonplaceholder.typicode.com/todos to see the data we want to retrieve to get a feeling of how it can look.
One item looks like this in json format.
{
"userId": 1,
"id": 1,
"title": "delectus aut autem",
"completed": false
}
What we can use for our items are the title property.
Let’s call this method to see that we actually get some data back. Call the getMenuItems() method. To do that we can make a initState in our _MyHomePageState class just above _incrementCounter().
4@override
  void initState() {
    super.initState();
    getMenuItems();
  }
Great we are now calling on the method. But we have no idea if it is actually doing something. Let’s add some printing to our console like so in our initState() we just added. So what we do is that we wait for the result then print out the incoming json data with jsonDecode() inside the then method.
Future futureMenuItems;

  @override
  void initState() {
    super.initState();

    getMenuItems().then((value) => print(jsonDecode(value.body)));
  }
Let’s do a Hot Restart (R) and we can see the data being printed out in our console:
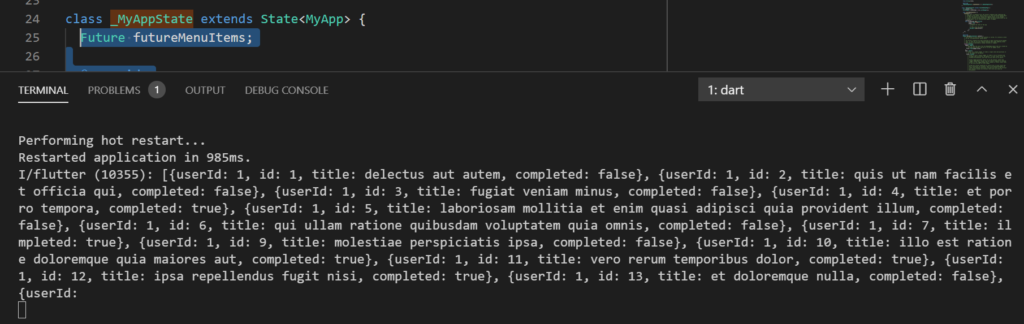
Looks like we got a respond when the application in started which is what we want. We now want to fill our list with this data. Should be easy enough, and to do it “right” we should have a class so we have the menu items properly defined.
5. Add class
I’ll start by adding a folder under lib called models. Inside this folder I’ll create file for the class called MenuItem.dart and define the following properties.
class MenuItem {
  final String title;

  MenuItem({this.title});

  factory MenuItem.fromJson(Map<String, dynamic> json) {
    return MenuItem(
      title: json['title'],
    );
  }
}
We now have a class with the title property. Notice how we also have a constructor where we take a value for the title in initialization and a factory method as well which we can use to pass the json data from the http get request to map up as a object.
Now set a Future property with the type of MenuItem since we no longer want generic data to work with and place it under the _MyHomePageState .
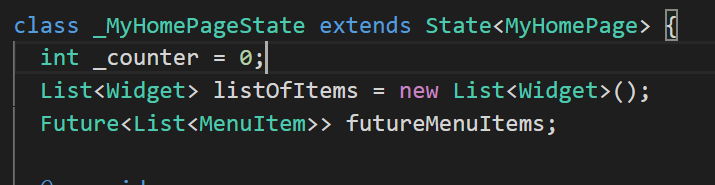
Future<List<MenuItem>> futureMenuItems;
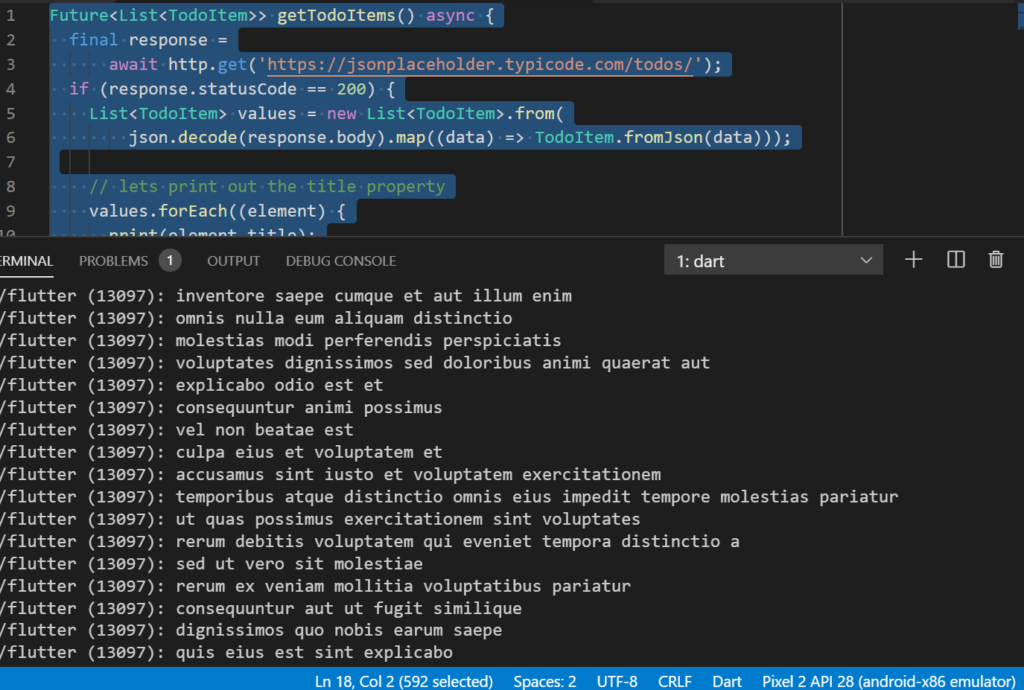
Update the getMenuItems() method as well
Future<List<MenuItem>> getMenuItems() async {
  final response =
      await http.get('https://jsonplaceholder.typicode.com/todos/');
  if (response.statusCode == 200) {
    List<MenuItem> values = new List<MenuItem>.from(
        json.decode(response.body).map((data) => MenuItem.fromJson(data)));

    // lets print out the title property
    values.forEach((element) {
      print(element.title);
    });
    return values;
  } else {
    // If the server did not return a 200 OK response,
    // then throw an exception.
    throw Exception('Failed to load album');
  }
}
Here we set and map the json data with help of the fromJson method to parse each element.
Now update your initState() and set the futureMenuItems propety to be equals to what we get from getMenuItems().
  @override
  void initState() {
    super.initState();
    futureMenuItems = getMenuItems();
  }
Okay, we got our data into our futureMenuItems variable. Time to use it in our drawer and replace what we’ve used before. So let’s change our drawer with a FutureBuilder() which we can use to take use of our futureMenuItems property, then we will use the generate function to create ListTitles.
drawer: Drawer(
          child: FutureBuilder(
              future: futureMenuItems,
              builder: (context, AsyncSnapshot<List<MenuItem>> snapshot) {
                if (!snapshot.hasData) {
                  return Container();
                } else {
                  return ListView(
                      children: List.generate(snapshot.data.length, (index) {
                    return ListTile(
                      title: Text(snapshot.data[index].title),
                      onTap: () {
                        Navigator.push(
                          context,
                          MaterialPageRoute(
                              builder: (context) => MenuItemPage(id: snapshot.data[index].id)),
                        );
                      },
                    );
                  }));
                }
              })),
      floatingActionButton: FloatingActionButton(
        onPressed: _incrementCounter,
        tooltip: 'Increment',
        child: Icon(Icons.add),
      ), // This trailing comma makes auto-formatting nicer for build methods.
    );
Note that we added MaterialPageRoute here for the onTap method which we are passing id as a parameter to the MenuItemPage constructor.
Since this id property from the MenuItem class is not yet created we’ll create it.
class MenuItem {
  final String title;
  final int id;
  MenuItem({this.title, this.id});

  factory MenuItem.fromJson(Map<String, dynamic> json) {
    return MenuItem(title: json['title'], id: json['id']);
  }
}
We are now also mapping up the id property in the FromJson method.
Great we can now do a hot reload and see that when we click on an item. We will see the text “Viewing Menu Item Page with ID X”, where X being any of the id you clicked on. Works pretty well! Now if you wanted the title text you could do the same way and pass that variable as well, however, what we will do instead is stay with the id only and then pick up the item data with help by the id. That way it is easier to grab more information from lists etc.
To make the List more accessible from more classes I’ll now make the futureMenuItems static and move it up to the MyHomePage. Of course you would have better structure and maybe create a proper main class with the name Main in it etc, but for the purpose of not dragging on too long we will make it static like this under the MyHomePage class straight under title:
static Future<List<MenuItem>> futureMenuItems;
Then also change the places futureMenuItems is used so it uses MyHomePage.futureMenuItems instead like this under the initState() method:
MyHomePage.futureMenuItems = getMenuItems();
and under the drawer future property:
future: MyHomePage.futureMenuItems,
It should work just like before, now we simply get the MenuItems data from the same place which is the MyHomePage class.
7. Finish MenuItemPage
Next up in the MenuItemPage we will now retrieve our item with the help of the id.
Now we will change things up, and since out widgets now needs to be able to re-render because of how it can change with our id we need it to be stateful. So what we will do is we will have MenuItemPage extend StatefulWidget and have an id defined just like before, then in our state we will need a FutureBuilder to wait for our value from FutureItems where we fetch the item we want from the id. Like this.
class MenuItemPage extends StatefulWidget {
  MenuItemPage({Key key, this.id}) : super(key: key);
  final int id;

  @override
  _MenuItemPageState createState() => _MenuItemPageState();
}

class _MenuItemPageState extends State<MenuItemPage> {
  @override
  void initState() {
    super.initState();
  }

  Future<MenuItem> loadItemDataForPage() async {
    MenuItem localMenuItem = new MenuItem();
    await MyHomePage.futureMenuItems.then((value) =>
        {localMenuItem = value.firstWhere((v) => v.id == widget.id)});
    return localMenuItem;
  }

  @override
  Widget build(BuildContext context) {
    return FutureBuilder(
        future: loadItemDataForPage(),
        builder: (context, snapshot) {
          if (!snapshot.hasData) {
            // Future hasn't finished yet, return a placeholder
            return Text('Loading');
          }
          return Scaffold(
              appBar: AppBar(
                title: Text("Another Page"),
              ),
              body: Center(
                  child: Column(
                mainAxisAlignment: MainAxisAlignment.center,
                crossAxisAlignment: CrossAxisAlignment.center,
                mainAxisSize: MainAxisSize.min,
                children: <Widget>[
                  Text('This is ID ${snapshot.data.id}'),
                  Text(snapshot.data.title),
                ],
              )));
        });
  }
}
A lot of things happening here but some notes to take after our latest changes:
- We made the MenuItemPage widget Stateful instead of Stateless
- We made a loadItemDataForPage method which returns a Future containing the MenuItem. In this method we fetch the item we want from the ID we passed from the menu when we clicked on one of the items.
- We render all of this with a FutureBuilder which waits for the loadItemDataForPage to complete and pass it down so we can display it. We use Scaffold so we got the whole app structure and it looks good.
Let’s try it out after doing a Hot Reload.
Results should be that you are now able to click up the menu, click on an item which is coming from the http get request, and then get a more detailed page of said item! Obviously we don’t have anything more really because our data source is very simple, it’s just id and title here, but imagine if there was a picture and description, then you could show that on this detailed page as well! That is kind of the thing what I wanted to introduce here.
Then you’d get something like in the image above. Feel free to remove the plus icon along with the listOfItems property and functionality since it is no longer used.
Latest Comments