If you have stumbled upon this error: “FirebaseOptions cannot be null when creating the default app”. From what I can tell I see that there can be a few different issues.
One of them is that you are using a lower version of Flutter which have the requirement of the function of Firebase.initializeApp() to pass the options into the initializeApp function which you’ve simply forgot.
Another issue is that you have placed the google-services.json file in the wrong directory. It should be inside the android app folder, like so android\app. Could also be an issue of not adding dependency google services to build.gradle (both in android/app folder and in android folder) like shown at the tutorial here.
Third one, and it’s specifically for flutter web, that is to say, I got the error and the only solution for the error to disappear and it would work as expected was to replace the index.html file contents with the example from a stackoverflow post here. See similar code below from my index.html file:
<!DOCTYPE html>
<html>

<head>
  <!--
    If you are serving your web app in a path other than the root, change the
    href value below to reflect the base path you are serving from.
    The path provided below has to start and end with a slash "/" in order for
    it to work correctly.
    Fore more details:
    * https://developer.mozilla.org/en-US/docs/Web/HTML/Element/base
  -->
  <base href="/">

  <meta charset="UTF-8">
  <meta content="IE=Edge" http-equiv="X-UA-Compatible">
  <meta name="description" content="A new Flutter project.">

  <!-- iOS meta tags & icons -->
  <meta name="apple-mobile-web-app-capable" content="yes">
  <meta name="apple-mobile-web-app-status-bar-style" content="black">
  <meta name="apple-mobile-web-app-title" content="chat">
  <link rel="apple-touch-icon" href="icons/Icon-192.png">

  <!-- Favicon -->
  <link rel="icon" type="image/png" href="favicon.png" />

  <title>chat</title>
  <link rel="manifest" href="manifest.json">
</head>

<body>
  <!-- Insert these scripts at the bottom of the HTML, but before you use any Firebase services -->

  <!-- Firebase App (the core Firebase SDK) is always required and must be listed first -->
  <script src="https://www.gstatic.com/firebasejs/8.4.3/firebase-app.js"></script>

  <!-- If you enabled Analytics in your project, add the Firebase SDK for Analytics -->
  <script src="https://www.gstatic.com/firebasejs/8.4.3/firebase-analytics.js"></script>

  <!-- Add Firebase products that you want to use -->
  <script src="https://www.gstatic.com/firebasejs/8.4.3/firebase-auth.js"></script>
  <script src="https://www.gstatic.com/firebasejs/8.4.3/firebase-firestore.js"></script>
  <!-- This script installs service_worker.js to provide PWA functionality to
       application. For more information, see:
       https://developers.google.com/web/fundamentals/primers/service-workers -->
  <script>
    // TODO: Replace the following with your app's Firebase project configuration
    // For Firebase JavaScript SDK v7.20.0 and later, `measurementId` is an optional field
    var firebaseConfig = {
      apiKey: "x",
      authDomain: "mything.firebaseapp.com",
      projectId: "mything",
      storageBucket: "mything.appspot.com",
      messagingSenderId: "x",
      appId: "x.",
      measurementId: "x"
    };

    // Initialize Firebase
    firebase.initializeApp(firebaseConfig);
  </script>
  <script>
    if ('serviceWorker' in navigator) {
      window.addEventListener('flutter-first-frame', function () {
        navigator.serviceWorker.register('flutter_service_worker.js');
      });
    }
  </script>

  <script src="main.dart.js" type="application/javascript"></script>
</body>

</html>
In this post I am going through setting up GoLang with SQLite. Also don’t forget checking out the official website if you want a good example how to go along creating a backend application using GoLang in general here, and of course this post. Checking their documentation you see how simple it is to actually get a GoLang app up and running. What we are going to do is something little bit different though, we are going to introduce SQLite into the equation. So the app is basically going to be a simple text board. All we will handle is loading posts from a SQLite database, and writing to it. To have some sort of UI we will use the framework React, to communicate with our GoLang backend.
Okay assuming you’ve downloaded and installed GoLang. Let’s create the backend.
First of all we set so that we are open for any requests from any domain. Of course, this is not what you would want to do in production, but for testing and to avoid any issues with CORS let’s just open everything up. We’ll also set so that we have a application/json Content-Type.
db, err := sql.Open("sqlite3", "./db.db")
Next up, we define two new variables, one for db and another for error. As you see, we are not using a new package called sql, and utilizing the Open method to initialize the database of the filename db.db into the variable db here.
So adding these packages will make Go download the Sqlite files needed, and the sql package as well.
Using the db variable we can now Query against a database and retrive data. What we will be working with is a table called posts with Title and Description columns. But wait, we don’t have any columns yet! Or maybe not even a db for that matter. Let’s create this.
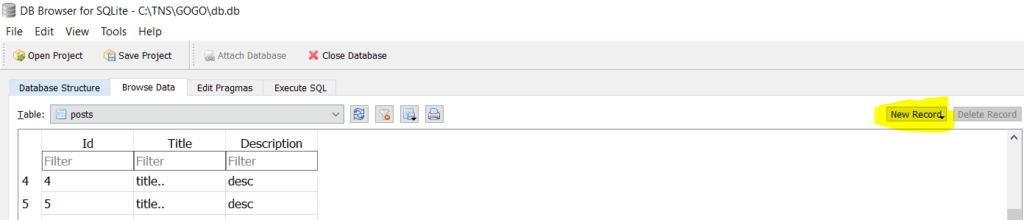
I usually use the program DB Browser for SQLite to create SQLite databases and run queries, and just to see how the database looks. You can download it here. Let’s open up the program and create a new database named db, do it in the same folder as the Go application you have. Then create a table that have those columns, you can use the SQL below if you want.
Now as you’ve seen we also have an error variable. We can have a method checkErr which runs the panic method if there is an error which will stop the application and prints out the error, create it outside the other functions.
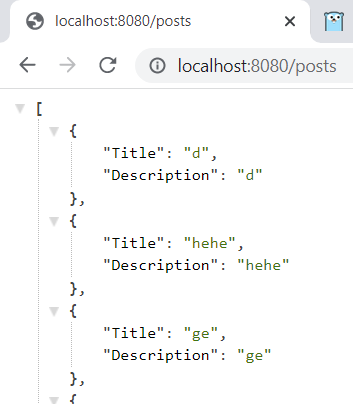
Now we should have a SQLite database we can run queries against with our GoLang app! Run the app with go run main.go in the terminal, now you can try the query if you go to the address http://localhost:8080/posts. If there is no error, there have been an successful SELECT.
Try inserting some rows into the table pressing the button below:
Fill in the data for each column. Now when we got some data, let’s add the code for retrieving and printing the value out as a JSON response. Below is all the code for posthandler.
type Post struct {
Title string
Description string
}
func posthandler(w http.ResponseWriter, r *http.Request) {
w.Header().Set("Content-Type", "application/json; charset=utf-8")
w.Header().Set("Access-Control-Allow-Origin", "*")
w.Header().Set("Access-Control-Allow-Credentials", "true")
w.Header().Set("Access-Control-Allow-Methods", "GET,HEAD,OPTIONS,POST,PUT")
w.Header().Set("Access-Control-Allow-Headers", "Access-Control-Allow-Headers, Origin,Accept, X-Requested-With, Content-Type, Access-Control-Request-Method, Access-Control-Request-Headers")
db, err := sql.Open("sqlite3", "./db.db")
checkErr(err)
rows, err := db.Query("SELECT Title, Description FROM posts ORDER BY Id DESC")
checkErr(err)
var posts []*Post // declare a slice of posts that will hold all of the Course instances scanned from the rows object
for rows.Next() { // run loop as long as we have rows
p := new(Post) // initialize a new Post instance
rows.Scan(&p.Title, &p.Description) // scan contents of the current row into the instance
posts = append(posts, p) // add each instance to the slice
}
// encode result into JSON
if err := json.NewEncoder(w).Encode(posts); err != nil {
log.Println(err)
}
rows.Close() //good habit to close even though it should be automatically after rows Next is done.
}
First of all, we’ve created a new struct which looks almost exactly the same as the table from the database with the field Title and Description. We will use this stuct for our slice we create named posts. Remember slices are very flexible and doesn’t need to have fixed amount of elements, and is generally just more convenient than arrays. Next up we will loop through the results with the help of the Next method from our rows, and we’ll create a new post named p then we copy the database field with the help of our Posts instance into the instance. The Scan function is a pretty neat way to copy values. Then we will use the append to add p to our posts-slice in the end of it.
To print out our posts slice, we first pass w (the http.ResponseWriter) into JSON.NewEncoder, and then Encode our actual posts slice.
Visiting the page again, we hopefully can see our data from the database.
CreateHandler – For creating posts in our SQLite database
Let’s add another handler for when visiting the URL create like this:
What is new here is that we are now running a INSERT INTO query. And for the values we put into the posts table, we use a declared map which we’ve parsed from the incoming JSON. So we got all the fields and its values into a map, from the Body in the requests.
We’ve also only made sure that the HandleFunc function only runs code from requests of the method type POST, meaning that if you go into the URL like this http://localhost:8080/create, nothing will happen because we have the r.Method == http.MethodPost condition there. You can try the Postman program to run POST requests with JSON data for the field title and description if you want, but we will take a look at fetching and inserting data from a React app now!
React Frontend app to communicate with Golang backend
Let’s start by creating a new React app. I’ll make it in the same folder of the golang app; should probably be divided into two separate folders but it’s up to you. Create it with the following command.
Now we want it to be typed in Typescript because it is just very good. Let it install all the necessary packages, and then go into the App.tsx file. So let’s have a textfield on top, and then posts below. Let’s have one state for the textfield, and one state for the posts.
First of all, we want to fetch our posts. A simple way to do that is to use the axios npm package which provides us the ability to make GET and POST requests with the .then functionality.
Let’s define some classes first so we can keep track of our incoming post objects and our textfield. In top of our file, define these:
As you can see, first of we have the const base URL, which is pointing to our golang app backend API/server. Then we will have a Post class which looks identical to the golang app with the field Title and Description. Then we have a Settings class too, this is just a single field which will keep track of our textfield, if it should be shown or not. Let’s proceed adding on more code, this time, inside App.
We have now defined some states. posts and settings and we can call setPosts and setSettings to update these states. Continuing on the App(), we will now add the fetching to our golang posthandler, meaning this URL: http://localhost:8080/create.
We use React useEffect so we don’t end up in an endless loop, so we know the component is mounted and ready. If you have some data, it should print out in the console. Let’s alter our App() return so it looks like this.
Nothing strange here, we go through the posts property and map it up into elements, and since we have a class for Posts, it’s easy to gain access to the class fields Title and Description. To keep the HTML elements unique for React we can set a key to the element, and I choose to just have a random number there along with the title.
The EditArea component is going to look something like this:
A little bit more code this time, and what is new is that we have two input elements which we keep track of the input value with the help of the states title and description. Everytime we change something in the text input or textarea we run the handleChange function and pass the current value, and in the handleChange function we set the state. As you can see, there is another function we are calling which is the SubmitPost. This function is placed under App() outside this function, so let’s add that too. We are passing the state values here to SubmitPost and from there we can set the next state (posts) with the help of SetPosts.
What we first to before we run setPosts with our new post, we actually choose to directly make a POST request with these values to our golang backend with the help of axios to insert into the SQLite database. When this is done, we will fetch the posts again, and when that is done, we will set the posts once more now including our new post.
EditButton component is the last one, it is a button to display the EditArea. A button for “Write Post”.
So feel free to try it out, everything should be done know! In case you or I missed explaining something, here is the full code for everything.
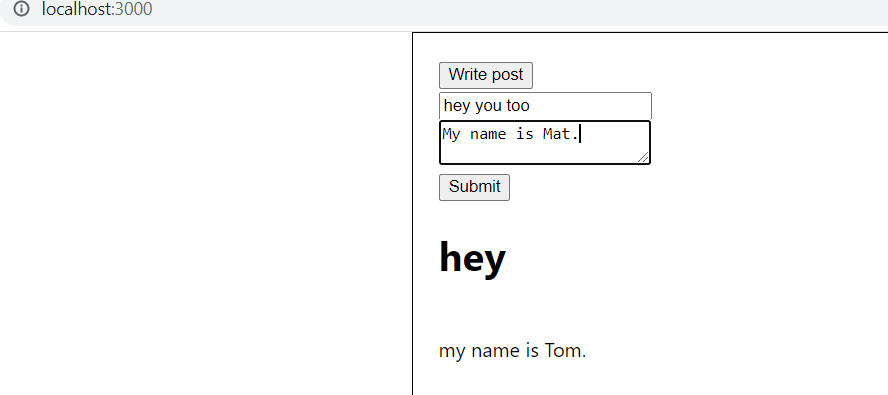
Results when done.
First the main.go file
package main
import (
	"database/sql"
	"encoding/json"
	"fmt"
	"log"
	"net/http"

	_ "github.com/mattn/go-sqlite3"
)
//fileidea.com
type Post struct {
Title string
Description string
}
func posthandler(w http.ResponseWriter, r *http.Request) {
w.Header().Set("Content-Type", "application/json; charset=utf-8")
w.Header().Set("Access-Control-Allow-Origin", "*")
w.Header().Set("Access-Control-Allow-Credentials", "true")
w.Header().Set("Access-Control-Allow-Methods", "GET,HEAD,OPTIONS,POST,PUT")
w.Header().Set("Access-Control-Allow-Headers", "Access-Control-Allow-Headers, Origin,Accept, X-Requested-With, Content-Type, Access-Control-Request-Method, Access-Control-Request-Headers")
db, err := sql.Open("sqlite3", "./db.db")
checkErr(err)
rows, err := db.Query("SELECT Title, Description FROM posts ORDER BY Id DESC")
checkErr(err)
var posts []*Post // declare a slice of posts that will hold all of the Course instances scanned from the rows object
for rows.Next() { // run loop as long as we have rows
p := new(Post) // initialize a new Post instance
rows.Scan(&p.Title, &p.Description) // scan contents of the current row into the instance
posts = append(posts, p) // add each instance to the slice
}
// encode result into JSON
if err := json.NewEncoder(w).Encode(posts); err != nil {
log.Println(err)
}
rows.Close() //good habit to close even though it should be automatically after rows Next is done.
}
func createhandler(w http.ResponseWriter, r *http.Request) {
w.Header().Set("Content-Type", "application/json; charset=utf-8")
w.Header().Set("Access-Control-Allow-Origin", "*")
w.Header().Set("Access-Control-Allow-Credentials", "true")
w.Header().Set("Access-Control-Allow-Methods", "GET,HEAD,OPTIONS,POST,PUT")
w.Header().Set("Access-Control-Allow-Headers", "Access-Control-Allow-Headers, Origin,Accept, X-Requested-With, Content-Type, Access-Control-Request-Method, Access-Control-Request-Headers")
if r.Method == http.MethodPost {
fmt.Println("here POST")
body := map[string]interface{}{}
json.NewDecoder(r.Body).Decode(&body)
db, err := sql.Open("sqlite3", "./db.db?parseTime=true")
checkErr(err)
stmt, err := db.Prepare("INSERT INTO posts(Title, Description) values(?,?)")
checkErr(err)
res, err := stmt.Exec(body["title"], body["description"])
checkErr(err)
fmt.Println(res.RowsAffected())
db.Close()
}
}
func main() {
http.HandleFunc("/posts", posthandler)
http.HandleFunc("/create", createhandler)
log.Fatal(http.ListenAndServe(":8080", nil))
}
func checkErr(err error) {
	if err != nil {
		panic(err)
	}
}

Latest Comments