Let us create firebase function for sending out email if there is a new user logging in through our Firebase app. To do this you should have a Firebase authentication set up already for an app. We are sending out the mail to new users with the help of a gmail account. We are also going to use a beautiful template for the email, and pass username to that template to welcome to user.
I am going to create a new folder called function-project.
Get the latest firebase-tools globally on your computer:
npm install -g firebase-tools
In my clean new functions-project folder I will run:
Entry point will be index.js.
I’ll login.
firebase login
Then get firebase initialized.
firebase init
Please select an option: Use an existing project
Do you want to use ESLint to catch probable bugs and enforce style?
No
Which Firebase CLI features do you want to set up for this folder?
Press Space to select features, then Enter to confirm your choices.
(X) Functions: Configure and deploy Cloud Functions
Do you want to install dependencies with npm now?
Yes
Then open up your index.js file which has been created with a helloWorld sample commented out.
Google already supplied their community with a great sample code to get started, so let’s use write that code into index.js and replace what we got generated.
/**
 * Based on Google Sample
 */
'use strict';

const functions = require('firebase-functions');
const nodemailer = require('nodemailer');

// TODO: Configure the `gmail.email` and `gmail.password` Google Cloud environment variables.
const gmailEmail = functions.config().gmail.email;
const gmailPassword = functions.config().gmail.password;
const mailTransport = nodemailer.createTransport({
    service: 'gmail',
    auth: {
        user: gmailEmail,
        pass: gmailPassword,
    },
});

// Your company name to include in the emails
// TODO: Change this to your app or company name to customize the email sent.
const APP_NAME = 'Cloud Storage for Firebase quickstart';

// [START sendWelcomeEmail]
/**
 * Sends a welcome email to new user.
 */
// [START onCreateTrigger]
exports.sendWelcomeEmail = functions.auth.user().onCreate((user) => {
    // [END onCreateTrigger]
    // [START eventAttributes]
    const email = user.email; // The email of the user.
    const displayName = user.displayName; // The display name of the user.
    // [END eventAttributes]

    return sendWelcomeEmail(email, displayName);
});
// [END sendWelcomeEmail]

// [START sendByeEmail]
/**
 * Send an account deleted email confirmation to users who delete their accounts.
 */
// [START onDeleteTrigger]
exports.sendByeEmail = functions.auth.user().onDelete((user) => {
    // [END onDeleteTrigger]
    const email = user.email;
    const displayName = user.displayName;

    return sendGoodbyeEmail(email, displayName);
});
// [END sendByeEmail]

// Sends a welcome email to the given user.
async function sendWelcomeEmail(email, displayName) {
    const mailOptions = {
        from: `${APP_NAME} <noreply@firebase.com>`,
        to: email,
    };

    // The user subscribed to the newsletter.
    mailOptions.subject = `Welcome to ${APP_NAME}!`;
    mailOptions.text = `Hey ${displayName || ''}! Welcome to ${APP_NAME}. I hope you will enjoy our service.`;
    await mailTransport.sendMail(mailOptions);
    console.log('New welcome email sent to:', email);
    return null;
}

// Sends a goodbye email to the given user.
async function sendGoodbyeEmail(email, displayName) {
    const mailOptions = {
        from: `${APP_NAME} <noreply@firebase.com>`,
        to: email,
    };

    // The user unsubscribed to the newsletter.
    mailOptions.subject = `Bye!`;
    mailOptions.text = `Hey ${displayName || ''}!, We confirm that we have deleted your ${APP_NAME} account.`;
    await mailTransport.sendMail(mailOptions);
    console.log('Account deletion confirmation email sent to:', email);
    return null;
}
Be sure to be in the right directory: functions.
Install nodemailer:
npm i nodemailer
Set the config variables for your (gmail) email account
firebase functions:config:set gmail.email="hello@example.com" gmail.password="mypassword"
Then type to deploy:
firebase deploy --only functions
I also had to select Pay as you go as payment plan to continue since I had more than one project using functions it seems.
Next we need enable these:
https://www.google.com/settings/security/lesssecureapps
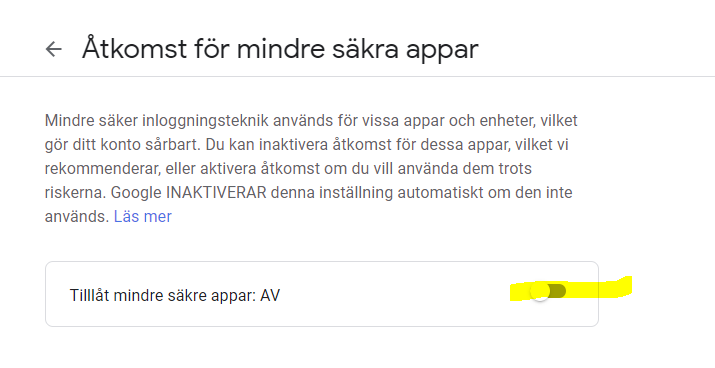
Enable that one then do similar thing for the next place at:
https://accounts.google.com/DisplayUnlockCaptcha
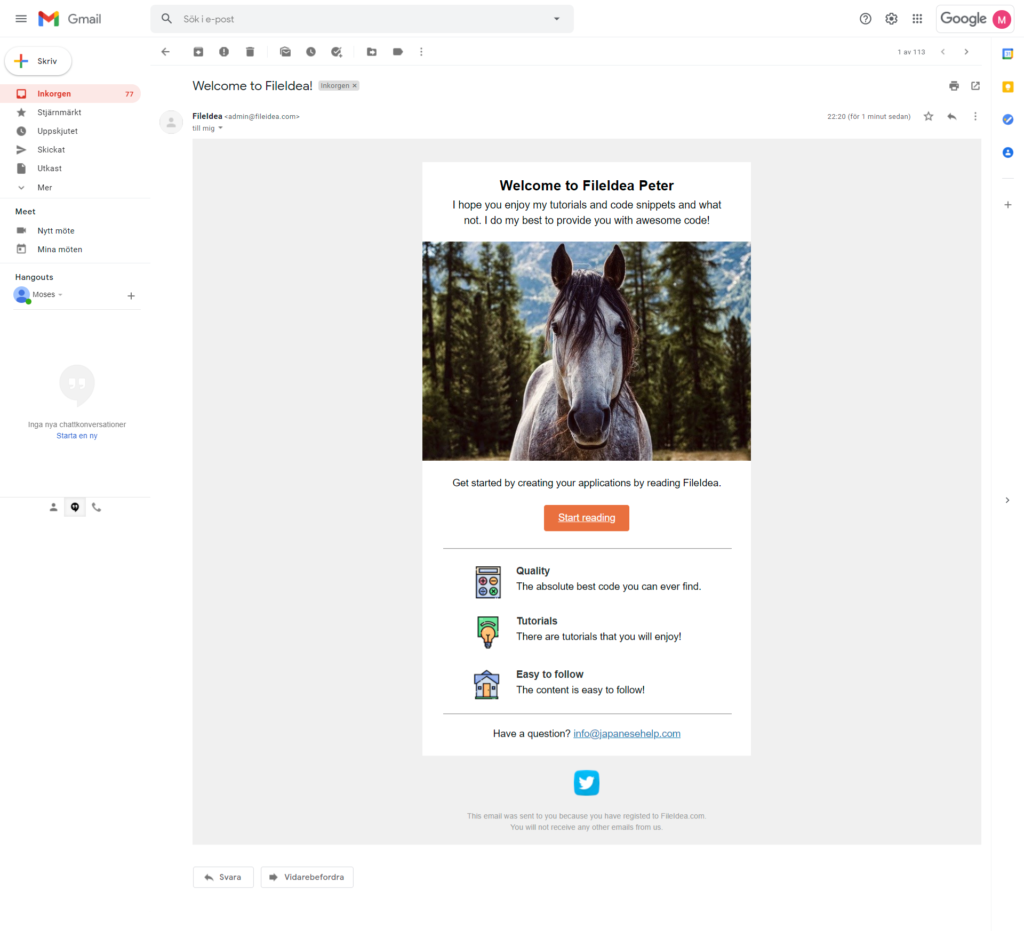
Result after logging in to the application
After I login to my application with gmail I receive an the welcome email as a user:

Use a Beautiful template for the email
To use a beautiful template for our email would certainly be an improvement, and to do that we need to just add a bunch of html in the email. That’s what is cool, you could pretty much send anything, no scripts of course, but you can have html and css just like a normal website. Of course, the text should also be sent because not all email providers will allow html and css. Then to make things more interesting we will pass our variables which can contain username and what not into the email template too. This is all accomplished with pure javascript working with the fs (filesystem) library.
With what we have above we will now modify a little bit.
Add this line of code in the top
const fs = require('fs');
Now we have a constant for the file system library. The fs library is included in node.js so nothing to do more here, let’s move on.
Now inside in our async function sendWelcomeEmail(email, displayName) method let’s add this just after our text and subject mailoptions properties.
fs.readFile('beautiful_template.html', { encoding: 'utf-8' }, async function (err, html) {
        if (err) {
          console.log(err);
          return null;
        } else {
          mailOptions.html = html
        }
        await mailTransport.sendMail(mailOptions);
        console.log('New welcome email sent to:', email);
      });
As you can see, we’ve now utilized the file system library to grab a beautiful html email template we have as the same path as this file, which we load and after it is loaded we set the html mailOptions property to this content.
Create a new file beautiful_template.html and paste the following content:
<!-- Set message background color one again -->
<table class="background" style="border-collapse: collapse; border-spacing: 0; margin: 0; padding: 0; width: 100%;"
border="0" width="100%" cellspacing="0" cellpadding="0" align="center">
<tbody>
<tr>
<td style="border-collapse: collapse; border-spacing: 0; margin: 0; padding: 0;" align="center" valign="top"
bgcolor="#F0F0F0">
<!-- WRAPPER -->
<!-- Set wrapper width (twice) -->
<table class="wrapper"
style="border-collapse: collapse; border-spacing: 0; padding: 0; width: inherit; max-width: 560px;"
border="0" width="560" cellspacing="0" cellpadding="0" align="center">
<tbody>
<tr>
<td style="border-collapse: collapse; border-spacing: 0; margin: 0; padding: 20px 6.25% 20px 6.25%; width: 87.5%;"
align="center" valign="top">
<!-- PREHEADER -->
<!-- Set text color to background color -->
<div class="preheader"
style="display: none; visibility: hidden; overflow: hidden; opacity: 0; font-size: 1px; line-height: 1px; height: 0; max-height: 0; max-width: 0; color: #f0f0f0;">
FileIdea reaches out to you and welcomes you</div>
<!-- LOGO -->
<!-- Image text color should be opposite to background color. Set your url, image src, alt and title. Alt text should fit the image size. Real image size should be x2. URL format: http://domain.com/?utm_source={{Campaign-Source}}&utm_medium=email&utm_content=logo&utm_campaign={{Campaign-Name}} -->
</td>
</tr>
<!-- End of WRAPPER -->
</tbody>
</table>
<!-- WRAPPER / CONTEINER -->
<!-- Set conteiner background color -->
<table class="container"
style="border-collapse: collapse; border-spacing: 0; padding: 0; width: inherit; max-width: 560px;"
border="0" width="560" cellspacing="0" cellpadding="0" align="center" bgcolor="#FFFFFF">
<!-- HEADER -->
<!-- Set text color and font family ("sans-serif" or "Georgia, serif") -->
<tbody>
<tr>
<td class="header"
style="border-collapse: collapse; border-spacing: 0; margin: 0; padding: 0; padding-left: 6.25%; padding-right: 6.25%; width: 87.5%; font-size: 24px; font-weight: bold; line-height: 130%; padding-top: 25px; color: #000000; font-family: sans-serif;"
align="center" valign="top">Welcome to FileIdea!</td>
</tr>
<!-- SUBHEADER -->
<!-- Set text color and font family ("sans-serif" or "Georgia, serif") -->
<tr>
<td class="subheader"
style="border-collapse: collapse; border-spacing: 0; margin: 0; padding: 5px 6.25% 3px 6.25%; width: 87.5%; font-size: 18px; font-weight: 300; line-height: 150%; color: #000000; font-family: sans-serif;"
align="center" valign="top">I hope you enjoy my tutorials and code snippets and what
not. I do my best to provide you with awesome code!</td>
</tr>
<!-- HERO IMAGE -->
<!-- Image text color should be opposite to background color. Set your url, image src, alt and title. Alt text should fit the image size. Real image size should be x2 (wrapper x2). Do not set height for flexible images (including "auto"). URL format: http://domain.com/?utm_source={{Campaign-Source}}&utm_medium=email&utm_content={{Ìmage-Name}}&utm_campaign={{Campaign-Name}} -->
<tr>
<td class="hero"
style="border-collapse: collapse; border-spacing: 0; margin: 0; padding: 0; padding-top: 20px;"
align="center" valign="top"><a style="text-decoration: none;"
href="https://fileidea.com" target="_blank" rel="noopener"><img
style="width: 100%; max-width: 560px; color: #000000; font-size: 13px; margin: 0; padding: 0; outline: none; text-decoration: none; -ms-interpolation-mode: bicubic; border: none; display: block;"
title="Hero Image" src="https://fileidea.com/wp-content/uploads/2021/01/1.jpg"
alt="Please enable images to view this content" width="560" border="0"
hspace="0" vspace="0" /></a></td>
</tr>
<!-- PARAGRAPH -->
<!-- Set text color and font family ("sans-serif" or "Georgia, serif"). Duplicate all text styles in links, including line-height -->
<tr>
<td class="paragraph"
style="border-collapse: collapse; border-spacing: 0; margin: 0; padding: 0; padding-left: 6.25%; padding-right: 6.25%; width: 87.5%; font-size: 17px; font-weight: 400; line-height: 160%; padding-top: 25px; color: #000000; font-family: sans-serif;"
align="center" valign="top">Get started by creating your applications by reading
FileIdea.</td>
</tr>
<!-- BUTTON -->
<!-- Set button background color at TD, link/text color at A and TD, font family ("sans-serif" or "Georgia, serif") at TD. For verification codes add "letter-spacing: 5px;". Link format: http://domain.com/?utm_source={{Campaign-Source}}&utm_medium=email&utm_content={{Button-Name}}&utm_campaign={{Campaign-Name}} -->
<tr>
<td class="button"
style="border-collapse: collapse; border-spacing: 0; margin: 0; padding: 25px 6.25% 5px 6.25%; width: 87.5%;"
align="center" valign="top">
<table
style="max-width: 240px; min-width: 120px; border-collapse: collapse; border-spacing: 0; padding: 0;"
border="0" cellspacing="0" cellpadding="0" align="center">
<tbody>
<tr>
<td style="padding: 12px 24px; margin: 0; text-decoration: underline; border-collapse: collapse; border-spacing: 0; border-radius: 4px; -webkit-border-radius: 4px; -moz-border-radius: 4px; -khtml-border-radius: 4px;"
align="center" valign="middle" bgcolor="#E9703E"><a
style="text-decoration: underline; color: #ffffff; font-family: sans-serif; font-size: 17px; font-weight: 400; line-height: 120%;"
href="https://fileidea.com/" target="_blank" rel="noopener">
Start reading</a></td>
</tr>
</tbody>
</table>
</td>
</tr>
<!-- LINE -->
<!-- Set line color -->
<tr>
<td class="line"
style="border-collapse: collapse; border-spacing: 0; margin: 0; padding: 0; padding-left: 6.25%; padding-right: 6.25%; width: 87.5%; padding-top: 25px;"
align="center" valign="top">
<hr style="margin: 0; padding: 0;" align="center" noshade="noshade" size="1"
width="100%" />
</td>
</tr>
<!-- LIST -->
<tr>
<td class="list-item"
style="border-collapse: collapse; border-spacing: 0; margin: 0; padding: 0; padding-left: 6.25%; padding-right: 6.25%;"
align="center" valign="top">
<table
style="width: inherit; margin: 0; padding: 0; border-collapse: collapse; border-spacing: 0;"
border="0" cellspacing="0" cellpadding="0" align="center">
<!-- LIST ITEM -->
<tbody>
<tr>
<!-- LIST ITEM IMAGE -->
<!-- Image text color should be opposite to background color. Set your url, image src, alt and title. Alt text should fit the image size. Real image size should be x2 -->
<td style="border-collapse: collapse; border-spacing: 0; padding-top: 30px; padding-right: 20px;"
align="left" valign="top"><img
style="padding: 0px; margin: 0px auto; outline: none; text-decoration: none; border: none; display: block; color: #000000;"
title="Resources"
src="https://fileidea.com/wp-content/uploads/2021/01/calculator.png"
alt="Newspappers" width="55" height="55" border="0" hspace="0"
vspace="0" /></td>
<!-- LIST ITEM TEXT -->
<!-- Set text color and font family ("sans-serif" or "Georgia, serif"). Duplicate all text styles in links, including line-height -->
<td class="paragraph"
style="font-size: 17px; font-weight: 400; line-height: 160%; border-collapse: collapse; border-spacing: 0; margin: 0; padding: 0; padding-top: 25px; color: #000000; font-family: sans-serif;"
align="left" valign="top"><strong
style="color: #333333;">Quality</strong><br /> The absolute best
code you can ever find.</td>
</tr>
<!-- LIST ITEM -->
<tr>
<!-- LIST ITEM IMAGE -->
<!-- Image text color should be opposite to background color. Set your url, image src, alt and title. Alt text should fit the image size. Real image size should be x2 -->
<td style="border-collapse: collapse; border-spacing: 0; padding-top: 30px; padding-right: 20px;"
align="left" valign="top"><img title="Resources"
src="https://fileidea.com/wp-content/uploads/2021/01/tips.png"
alt="Newspappers" width="55" height="55" border="0" hspace="0"
vspace="0" /></td>
<!-- LIST ITEM TEXT -->
<!-- Set text color and font family ("sans-serif" or "Georgia, serif"). Duplicate all text styles in links, including line-height -->
<td class="paragraph"
style="font-size: 17px; font-weight: 400; line-height: 160%; border-collapse: collapse; border-spacing: 0; margin: 0; padding: 0; padding-top: 25px; color: #000000; font-family: sans-serif;"
align="left" valign="top"><strong
style="color: #333333;">Tutorials</strong><br /> There are tutorials
that you will enjoy!</td>
</tr>
<!-- LIST ITEM -->
<tr>
<!-- LIST ITEM IMAGE -->
<!-- Image text color should be opposite to background color. Set your url, image src, alt and title. Alt text should fit the image size. Real image size should be x2 -->
<td style="border-collapse: collapse; border-spacing: 0; padding-top: 30px; padding-right: 20px;"
align="left" valign="top"><img
style="padding: 0; margin: 0; outline: none; text-decoration: none; -ms-interpolation-mode: bicubic; border: none; display: block; color: #000000;"
title="Translations"
src="https://fileidea.com/wp-content/uploads/2021/01/house.png"
alt="Translations" width="50" height="50" border="0" hspace="0"
vspace="0" /></td>
<!-- LIST ITEM TEXT -->
<!-- Set text color and font family ("sans-serif" or "Georgia, serif"). Duplicate all text styles in links, including line-height -->
<td class="paragraph"
style="font-size: 17px; font-weight: 400; line-height: 160%; border-collapse: collapse; border-spacing: 0; margin: 0; padding: 0; padding-top: 25px; color: #000000; font-family: sans-serif;"
align="left" valign="top"><strong style="color: #333333;">Easy to
follow</strong><br /> The content is easy to follow!</td>
</tr>
</tbody>
</table>
</td>
</tr>
<!-- LINE -->
<!-- Set line color -->
<tr>
<td class="line"
style="border-collapse: collapse; border-spacing: 0; margin: 0; padding: 0; padding-left: 6.25%; padding-right: 6.25%; width: 87.5%; padding-top: 25px;"
align="center" valign="top">
<hr style="margin: 0; padding: 0;" align="center" noshade="noshade" size="1"
width="100%" />
</td>
</tr>
<!-- PARAGRAPH -->
<!-- Set text color and font family ("sans-serif" or "Georgia, serif"). Duplicate all text styles in links, including line-height -->
<tr>
<td class="paragraph"
style="border-collapse: collapse; border-spacing: 0; margin: 0; padding: 20px 6.25% 25px 6.25%; width: 87.5%; font-size: 17px; font-weight: 400; line-height: 160%; color: #000000; font-family: sans-serif;"
align="center" valign="top">Have a question? <a
style="color: #127db3; font-family: sans-serif; font-size: 17px; font-weight: 400; line-height: 160%;"
href="mailto:info@fileidea.com" target="_blank"
rel="noopener">info@fileidea.com</a></td>
</tr>
<!-- End of WRAPPER -->
</tbody>
</table>
<!-- WRAPPER -->
<!-- Set wrapper width (twice) -->
<table class="wrapper"
style="border-collapse: collapse; border-spacing: 0; padding: 0; width: inherit; max-width: 560px;"
border="0" width="560" cellspacing="0" cellpadding="0" align="center">
<!-- SOCIAL NETWORKS -->
<!-- Image text color should be opposite to background color. Set your url, image src, alt and title. Alt text should fit the image size. Real image size should be x2 -->
<tbody>
<tr>
<td class="social-icons"
style="border-collapse: collapse; border-spacing: 0; margin: 0; padding: 0; padding-left: 6.25%; padding-right: 6.25%; width: 87.5%; padding-top: 25px;"
align="center" valign="top">
<table style="border-collapse: collapse; border-spacing: 0; padding: 0;" border="0"
width="256" cellspacing="0" cellpadding="0" align="center">
<tbody>
<tr>
<!-- ICON 2 -->
<td style="margin: 0; padding: 0; padding-left: 10px; padding-right: 10px; border-collapse: collapse; border-spacing: 0;"
align="center" valign="middle"><a style="text-decoration: none;"
href="https://twitter.com/mytwitterhandle" target="_blank"
rel="noopener"><img
style="padding: 0; margin: 0; outline: none; text-decoration: none; -ms-interpolation-mode: bicubic; border: none; display: inline-block; color: #000000;"
title="Twitter"
src="https://fileidea.com/wp-content/uploads/2021/01/twitter.png"
alt="T" width="44" height="44" border="0" hspace="0"
vspace="0" /></a>
</td>
</tr>
</tbody>
</table>
</td>
</tr>
<!-- FOOTER -->
<!-- Set text color and font family ("sans-serif" or "Georgia, serif"). Duplicate all text styles in links, including line-height -->
<tr>
<td class="footer"
style="border-collapse: collapse; border-spacing: 0; margin: 0; padding: 20px 6.25% 20px 6.25%; width: 87.5%; font-size: 13px; font-weight: 400; line-height: 150%; color: #999999; font-family: sans-serif;"
align="center" valign="top">This email was sent to you because you have registed to
FileIdea.com.<br /> You will not receive any other emails from us.
<!-- ANALYTICS -->
<!-- https://www.google-analytics.com/collect?v=1&tid={{UA-Tracking-ID}}&cid={{Client-ID}}&t=event&ec=email&ea=open&cs={{Campaign-Source}}&cm=email&cn={{Campaign-Name}} -->
<!-- <img width="1" height="1" border="0" vspace="0" hspace="0" style="margin: 0; padding: 0; outline: none; text-decoration: none; -ms-interpolation-mode: bicubic; border: none; display: block;"
src="https://raw.githubusercontent.com/konsav/email-templates/master/images/tracker.png" /> -->
</td>
</tr>
<!-- End of WRAPPER -->
</tbody>
</table>
<!-- End of SECTION / BACKGROUND -->
</td>
</tr>
</tbody>
</table>
Edit this in your favorite html editor and replace texts and images to your own. One thing to remember is that all images has to be external since the images won’t be going up to the Google Firebase functions area.
This template and where you can find more mail templates: https://github.com/konsav/email-templates/. Icons used in this example is made by Freepik from www.flaticon.com.
Just to be clear let us preview the functions code again from our index.js file, this is now how the sendWelcomeEmail works:
// First our method which runs when a user signs up
exports.sendWelcomeEmail = functions.auth.user().onCreate((user) => {

    const email = user.email; // The email of the user.
    const displayName = user.displayName; // The display name of the user.

    // we will call on our method below
    return sendWelcomeEmail(email, displayName);
});

// Sends a welcome email to the given user.
async function sendWelcomeEmail(email, displayName) {
    const mailOptions = {
        from: `${APP_NAME} <noreply@fileidea.com>`, // change this one to your domain
        to: email,
    };

    mailOptions.subject = `Welcome to ${APP_NAME}!`;
    mailOptions.text = `Hey ${displayName || ''}! Welcome to ${APP_NAME}. I hope you will enjoy our service.`;

    fs.readFile('beautiful_template.html', { encoding: 'utf-8' }, async function (err, html) {
        if (err) {
            console.log(err);
            return null;
        } else {
            mailOptions.html = html
        }
        await mailTransport.sendMail(mailOptions);
        console.log('New welcome email sent to:', email);
    });
}
Okay, so let’s deploy what we have right now. Go to your functions folder and type and run
firebase deploy --only functions
To test it, we need to become a user to our applications. I’ll do that.
I got a new email:


I zoomed out little bit here, but that’s pretty much the result and how you do it! Beautiful is maybe an exaggeration but you get the point 🙂
Pass parameters such as username into the email template
Okay cool we can get an email sent to us at user registration with a bunch of information with an email template, however there is no username or anything. To make more things personal, let’s add the username variable to our template.
This might not be the best way but I don’t see any issues with it so what we want to do is have a string declared in the template we want to replace with the actual username, I am going to go with §§_§§. Just anything works that is unique enough. That string is what we want to replace. In our template I have now added it just after the welcome title like this:
<td class="header"
    style="border-collapse: collapse; border-spacing: 0; margin: 0; padding: 0; padding-left: 6.25%; padding-right: 6.25%; width: 87.5%; font-size: 24px; font-weight: bold; line-height: 130%; padding-top: 25px; color: #000000; font-family: sans-serif;"
    align="center" valign="top">Welcome to FileIdea §§_§§!</td>
And inside the fs.readFile callback method I am going to replace the string with the username in our html and return it like this:
    fs.readFile('beautiful_template.html', { encoding: 'utf-8' }, async function (err, html) {
        if (err) {
            console.log(err);
            return null;
        } else {
            html = html.replace("§§_§§", displayName)
            mailOptions.html = html
        }
        await mailTransport.sendMail(mailOptions);
        console.log('New welcome email sent to:', email);
    });
You can obviously add more things around the template and pass more variables if you would want that but I am pretty happy with just the username right there.
Save and deploy.
firebase deploy --only functions
Result – after signing up username appears in the email template
I see the title with my name after logging in!
We have now accomplished what we were going for.