

Showing the finished tutorial result of when visiting http://localhost:4200/awesome-stuff, their menu links highlighted depending on what page-url you are in.
Something that wasn’t clear from me from the start when starting with Angular was how to indicate that the page is active whenever you are on it. If you are at the homepage, the home menu item should be active with bold styling or highlighted in any way, and if I go to another page, it should change and be the other page instead and so forth. Pretty straight forward. How does it work in Angular? Well it turns out it is very simple! To make things more fun we will use Bootstrap and have a simple Bootstrap layout so that we have a menu to the left and the content to the right so the menu is visible at all times.
Let us create a new project with ng new assuming you have installed Angular already. I am using Angular 10 right now. Mine is called MyMenuApp.
ng new MyMenuApp
I am going to go with routing and CSS as styling syntax.
Go into your directory and do the serve to see it is up and running. First we will use cd to go into the root app directory then type the ng serve command.
cd .\MyMenuApp\
ng serve
You should have an app up and running with sample code.
Add bootstrap
Now we will prepare some layout and styling for our application. To keep things pretty and structured we will import the bootstrap framework. By using bootstrap we can easily have the menu in a column to the left and our main content to the right. There are different ways to import the framework, but we will go with the npm install way which I believe is the easiest. Type the npm install/i command as below.
npm i bootstrap
Okay good we have bootstrap in our modules folder. Now we just need to refer to it.
Open your angular.json file and look for the “styles” property and add bootstrap.min.css.
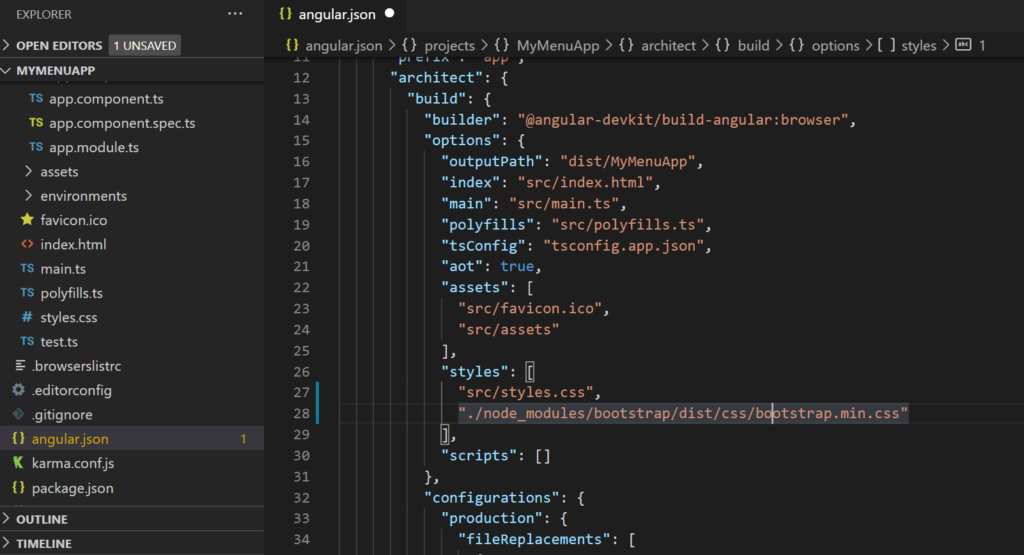
Now my angular.json file looks like this.
{
  "$schema": "./node_modules/@angular/cli/lib/config/schema.json",
  "version": 1,
  "newProjectRoot": "projects",
  "projects": {
    "MyMenuApp": {
      "projectType": "application",
      "schematics": {},
      "root": "",
      "sourceRoot": "src",
      "prefix": "app",
      "architect": {
        "build": {
          "builder": "@angular-devkit/build-angular:browser",
          "options": {
            "outputPath": "dist/MyMenuApp",
            "index": "src/index.html",
            "main": "src/main.ts",
            "polyfills": "src/polyfills.ts",
            "tsConfig": "tsconfig.app.json",
            "aot": true,
            "assets": [
              "src/favicon.ico",
              "src/assets"
            ],
            "styles": [
              "src/styles.css",
              "./node_modules/bootstrap/dist/css/bootstrap.min.css"
            ],
            "scripts": []
          },
          "configurations": {
            "production": {
              "fileReplacements": [
                {
                  "replace": "src/environments/environment.ts",
                  "with": "src/environments/environment.prod.ts"
                }
              ],
              "optimization": true,
              "outputHashing": "all",
              "sourceMap": false,
              "extractCss": true,
              "namedChunks": false,
              "extractLicenses": true,
              "vendorChunk": false,
              "buildOptimizer": true,
              "budgets": [
                {
                  "type": "initial",
                  "maximumWarning": "2mb",
                  "maximumError": "5mb"
                },
                {
                  "type": "anyComponentStyle",
                  "maximumWarning": "6kb",
                  "maximumError": "10kb"
                }
              ]
            }
          }
        },
        "serve": {
          "builder": "@angular-devkit/build-angular:dev-server",
          "options": {
            "browserTarget": "MyMenuApp:build"
          },
          "configurations": {
            "production": {
              "browserTarget": "MyMenuApp:build:production"
            }
          }
        },
        "extract-i18n": {
          "builder": "@angular-devkit/build-angular:extract-i18n",
          "options": {
            "browserTarget": "MyMenuApp:build"
          }
        },
        "test": {
          "builder": "@angular-devkit/build-angular:karma",
          "options": {
            "main": "src/test.ts",
            "polyfills": "src/polyfills.ts",
            "tsConfig": "tsconfig.spec.json",
            "karmaConfig": "karma.conf.js",
            "assets": [
              "src/favicon.ico",
              "src/assets"
            ],
            "styles": [
              "src/styles.css"
            ],
            "scripts": []
          }
        },
        "lint": {
          "builder": "@angular-devkit/build-angular:tslint",
          "options": {
            "tsConfig": [
              "tsconfig.app.json",
              "tsconfig.spec.json",
              "e2e/tsconfig.json"
            ],
            "exclude": [
              "**/node_modules/**"
            ]
          }
        },
        "e2e": {
          "builder": "@angular-devkit/build-angular:protractor",
          "options": {
            "protractorConfig": "e2e/protractor.conf.js",
            "devServerTarget": "MyMenuApp:serve"
          },
          "configurations": {
            "production": {
              "devServerTarget": "MyMenuApp:serve:production"
            }
          }
        }
      }
    }},
  "defaultProject": "MyMenuApp"
}
As you can see in the above, that is where it should be placed. Now you got bootstrap in your application everywhere! Great.
Then in my styles.css I am going to add some CSS for layout purposes.
.content {
    padding: 20px;
}

body p{
  white-space: pre-wrap;
  font-size: 1.25em
}
The index.html in the src folder are we going to keep it as it is. So don’t touch it, it should look something like this.
<!doctype html>
<html lang="en">

<head>
  <meta charset="utf-8">
  <title>MyMenuApp</title>
  <base href="/">
  <meta name="viewport" content="width=device-width, initial-scale=1">
  <link rel="icon" type="image/x-icon" href="favicon.ico">
</head>

<body>
  <app-root></app-root>
</body>

</html>
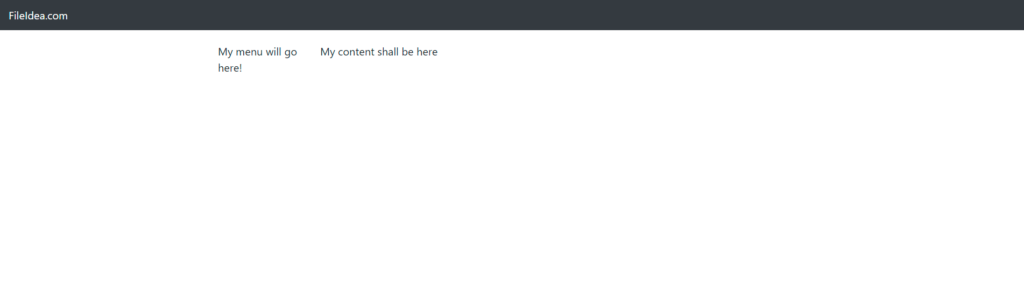
Let’s now modify the app.component.html little bit, to make sure we have a place for the menu and the content. We are going to have the menu in a col-md-2 column which should be a proper width for a menu, and then the content will be a col-md-10 to take up the remaining space. Remove everything in the app.component.html file and then write.
<nav class="navbar navbar-expand-md navbar-dark bg-dark mb-4">
  <a class="navbar-brand" href="http://fileidea.com">FileIdea.com</a>
  <button class="navbar-toggler" type="button" data-toggle="collapse" data-target="#navbarCollapse"
    aria-controls="navbarCollapse" aria-expanded="false" aria-label="Toggle navigation">
    <span class="navbar-toggler-icon"></span>
  </button>
</nav>
<div class="container">
  <div class="row">
    <div class="col-md-2">
      <p>My menu will go here!</p>
    </div>
    <div class="col-md-10">
      <div class="content" role="main">
        <!-- Main Content -->
        <p>My content shall be here</p>
        <router-outlet></router-outlet>
      </div>
    </div>
  </div>
</div>
Now we have a nice little page that should look something like this.
We don’t have menu or content yet, only our text placeholders. So why don’t we create a menu component with the ng command. Go to your root project folder and type
ng generate component listMenu
We should now have a new folder containing the component. Open the list-menu.component.html and add some links! Here is where we can declare links to be active with the routing of our Angular application which is the whole purpose of this tutorial post. Replace all the sample code or text from the list-menu.component.html and replace it with the following
<div class="menu-area">
    <h3>Sections</h3>
    <div class="list-group">
        <a [routerLinkActiveOptions]="{exact: true}" routerLinkActive="active" [routerLink]="['']"
            class="list-group-item list-group-item-action">Home</a>
    </div>
</div>
Here is where the magic happens. Whenever the person is in the routing path that is matching with the routerLink path this will get an active class because of the routerLinkActive equals to active. So [routerLink]=”[”] means that if we are browsing at the home page we will get the active class for this element, this link. The routerLinkActiveOptions exact true tells us the path must match exactly.
Now we have some styling on top of this too. The active class doesn’t do anything without some declared CSS so let’s get that done as well!
Open the CSS file for the component, list-menu.component.css and add
.dropdown
{
    font-size: 20px;
}
.active
{
    z-index: 2;
    color: #fff;
    background-color: #007bff;
    border-color: #007bff;
}
.menu-area
{
    padding:20px;
}
Great we got this menu component ready to go! We can’t see it anywhere, so let’s add it to our main app component so we will always see it. Open app.component.html and add it.
<nav class="navbar navbar-expand-md navbar-dark bg-dark mb-4">
  <a class="navbar-brand" href="http://fileidea.com">FileIdea.com</a>
  <button class="navbar-toggler" type="button" data-toggle="collapse" data-target="#navbarCollapse"
    aria-controls="navbarCollapse" aria-expanded="false" aria-label="Toggle navigation">
    <span class="navbar-toggler-icon"></span>
  </button>
</nav>
<div class="container">
  <div class="row">
    <div class="col-md-2">
      <app-list-menu></app-list-menu>
    </div>
    <div class="col-md-10">
      <div class="content" role="main">
        <!-- Main Content -->
        <p>My content shall be here</p>
        <router-outlet></router-outlet>
      </div>
    </div>
  </div>
</div>
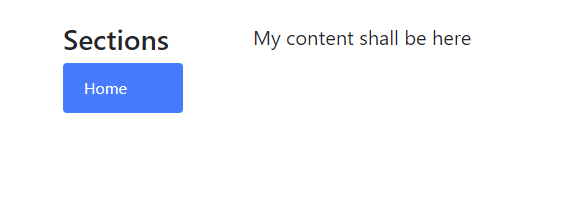
Okay we added it and should now be able to see it in our home page. See that the link is highlighted? This is because we are http://localhost:4200/ which has the path “”. Let’s add another component which will work as another page on another routing.
ng generate component awesomeStuff
Another component as been generated! Now you can add whatever you want into the awesomeStuff component, that is not important for now. I will just add this.
<h3>Awesome stuff</h3>
<p>This is something really.</p>
Now instead of adding it into the app component directly, we will open up our routing file app-routing.module.ts. There we will add this component to a new path. Below you can see the highlighted new path I added to the routes array.
import { NgModule } from '@angular/core';
import { Routes, RouterModule } from '@angular/router';
import { AwesomeStuffComponent } from './awesome-stuff/awesome-stuff.component';

const routes: Routes = [
  { path: 'awesome-stuff', component: AwesomeStuffComponent },
];

@NgModule({
  imports: [RouterModule.forRoot(routes)],
  exports: [RouterModule]
})
export class AppRoutingModule { }
Great we got a new component for our routes! Now open up your menu component list-menu.component.html and add a new link just the same way you did last time but with the path we just added. Now my list-menu.component.html looks like this. See the highlight of what I added here.
<div class="menu-area">
    <h3>Sections</h3>
    <div class="list-group">
        <a [routerLinkActiveOptions]="{exact: true}" routerLinkActive="active" [routerLink]="['']"
            class="list-group-item list-group-item-action">Home</a>
            <a [routerLinkActiveOptions]="{exact: true}" routerLinkActive="active" [routerLink]="['awesome-stuff']"
            class="list-group-item list-group-item-action">Awesome Stuff</a>
    </div>
</div>
Awesome stuff has been linked. Now you should have a nice little app where you can visiting different links and they will get highlighted if you are at that location.
Now can also remove the html placeholder <p>My content shall be here</p> from the app.component.html page since it doesn’t serve a purpose anymore.
Now to avoid the complete whiteness when visiting http://localhost:4200/ we can add a component which will serve as the home component into our routing. Let’s add a new component that will be the welcoming content.
ng generate component home
Let’s add some html like we did before.
<h3>Home</h3>
<p>Welcome to FileIdea!</p>
Then go to routing again, and add this to the “” path.
import { NgModule } from '@angular/core';
import { Routes, RouterModule } from '@angular/router';
import { AwesomeStuffComponent } from './awesome-stuff/awesome-stuff.component';
import { HomeComponent } from './home/home.component';

const routes: Routes = [
  { path: '', component: HomeComponent },
  { path: 'awesome-stuff', component: AwesomeStuffComponent },
];

@NgModule({
  imports: [RouterModule.forRoot(routes)],
  exports: [RouterModule]
})
export class AppRoutingModule { }
I noticed that when I tested that col-md-2 might be a but small for the menu so increasing it to col-md-4 and setting the content to col-md-10 did the trick! This is just a small detail.
And we are now done!